Remember that special feeling of standing barefoot on cool, damp earth after a summer rain, inhaling the fresh, incomparable aroma? Or when you hear the soothing buzz of bees busy collecting nectar among fragrant flowers? These moments are true magic, accessible to anyone who has decided to turn their garden into something more than just a plot of land. Today, we’ll talk about one of the most enchanting landscape design techniques that can transform your plot beyond recognition – creating a flower river.
What is a Flower River and Why is it a Garden Design Trend?
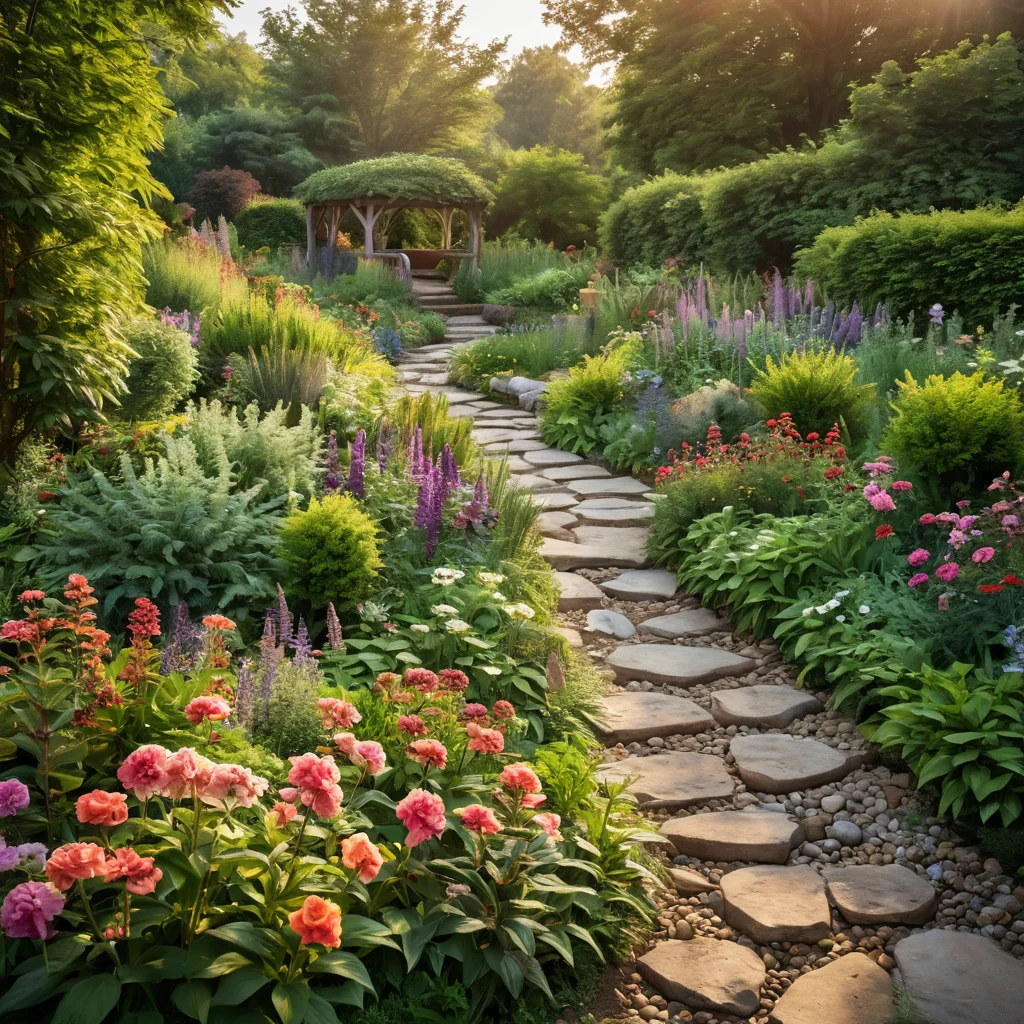
A flower river is not just a flowerbed, but rather a picturesque, elongated planting area that mimics the curves and flow of a natural river, filled with a cascade of flowering plants. Its main feature is its smooth, winding shapes, which create a sense of movement and dynamism in the garden. Instead of strict geometric lines of flowerbeds, a flower river adds naturalness and lightness.
Why has this technique become so popular? Firstly, it’s incredibly beautiful! The interplay of colors, the play of shades, the variety of shapes and textures create a captivating spectacle that delights the eye from spring to late autumn. Secondly, a flower river is a great way to zone space, visually divide large areas, or, conversely, fill an empty space, making it cozy and harmonious. It can serve as a natural divider between relaxation areas and a fruit garden, or smoothly integrate into the existing landscape, uniting disparate elements.
Moreover, creating a flower river is a wonderful opportunity to express your imagination and creativity. You can experiment with color combinations, plant heights, and textures, creating truly unique compositions. This is a great example of how DIY garden decor ideas can transform a plot, making it special.
Key benefits of a flower river:
- Aesthetic Appeal: Creates a bright, dynamic, and picturesque accent in the garden.
- Visual Zoning: Helps divide space and create cozy corners.
- Adaptability: Can be implemented in both large and small areas.
- Creative Freedom: Allows for experimentation with plants and color schemes.
- Attracts Beneficial Insects: An abundance of flowers is a real paradise for bees and butterflies.
A flower river is not just a trendy concept; it’s a way to bring a piece of natural beauty into your garden, creating a harmonious space that will delight you and your loved ones all year round. It’s a great example of budget-friendly landscape design that, with a competent approach, can look like an expensive work of art.
How to Choose the Ideal Location for a Flower River in Your Garden?
Choosing the right location is perhaps the most crucial step in creating your future flower river. It determines how well the plants will thrive, how spectacular the composition will look, and how easy it will be for you to care for it. Believe my experience, even the most well-thought-out planting scheme won’t work if you choose the wrong spot for it.
Key factors to consider:
- Sunlight: This is arguably the main criterion. Most flowering plants love the sun. Therefore, the ideal location for a flower river is a well-lit area where the sun shines for at least 5-6 hours a day. If your garden is mostly shady, don’t despair! There are beautiful shade-tolerant plants that can also create a captivating composition. You’ll just need to be more meticulous in selecting the assortment.
- Visibility: Think about where your flower river will look most advantageous. This could be:
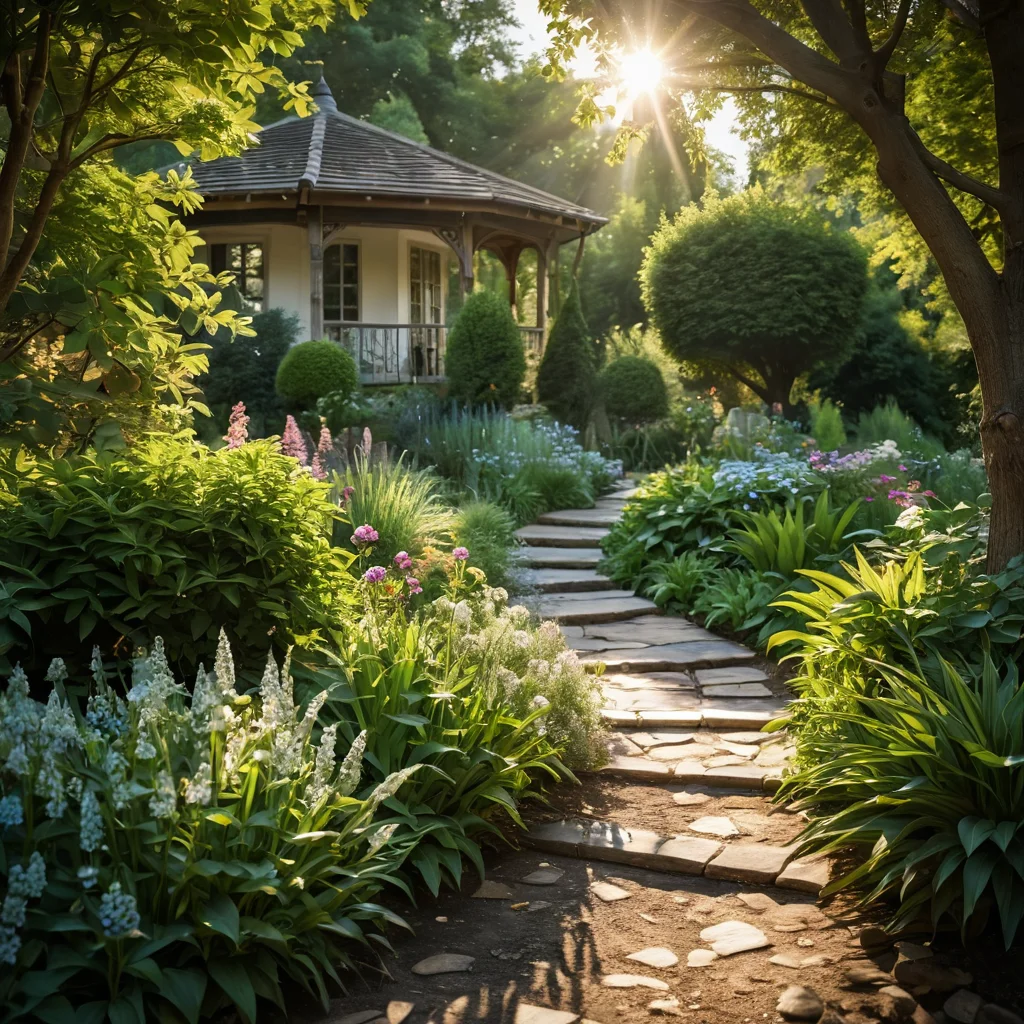
- Along a path: such a river will entice you to walk through the garden, creating a sense of journey.
- In front of the house or a seating area: so you can admire it effortlessly, for example, from the kitchen window or the terrace.
- In the center of the lawn: as a bright, picturesque island.
- Along a fence or a blank wall: to liven up a dull space and add color.
- Terrain: It’s ideal if the location has a slight slope. This will give your flower river a natural look, as if water is actually flowing. However, you can also create an impressive design on flat ground by using height differences within the composition itself.
- Soil Moisture: Ensure that water does not stagnate in the chosen location. Most plants prefer moderately moist but well-drained soil. If the area is prone to waterlogging, additional drainage will be required.
- Area Size: Don’t try to fit a huge river into a tiny garden. It will look out of place. In a small area, it’s better to create a more compact, but no less impressive, winding flowerbed. Conversely, a small river can get lost in a large space.
- Accessibility for Care: It’s important to have easy access to your flower river from all sides, especially if it’s wide. You’ll need to water, weed, and fertilize the plants.
Tip from an experienced gardener: Before digging and planting, draw a plan of your plot and schematically mark the location for the future river. Try different curve options, imagine how it will look from different viewpoints. You can even outline its contours directly on the ground with a hose or sand to assess the scale and shape.
Don’t be afraid to experiment! Sometimes the most unexpected places can be ideal for creating a true floral masterpiece. The main thing is to observe your plot, feel it, and listen to your desires.
Types of Flower Rivers: From Smooth Transitions to Bright Bursts
A flower river is not a static structure, but rather a flexible idea that can be adapted to any conditions and desires. There are many ways to implement this concept, from the simplest to quite complex. Let’s look at the main types so you can choose the one that suits you best.
1. Monochrome River
This option involves using plants of one or similar shades. Such rivers create a very calm, soothing impression. Imagine a wave of blue or lilac flowers – it can be incredibly striking and elegant. This design is perfect for small gardens or for those who prefer a restrained palette.
- Advantages: Calmness, elegance, visually expands space.
- Examples: A river of blue hydrangeas, blue hostas, lavender; a river of white astilbes, daisies, baby’s breath.
2. Rainbow River
Here we play on contrasts and color transitions. A rainbow river is a cascade of shades, smoothly flowing into each other. This can be a transition from yellow to orange, from pink to red, or a more complex scheme using all the colors of the rainbow. This option requires a more careful selection of plants, but the result exceeds all expectations.
- Advantages: Brightness, dynamism, creates a sense of movement and energy.
- Examples: Transition from bright yellow daffodils in spring to orange marigolds in summer and red-burgundy dahlias in autumn.
3. River with “Riffles” and “Islands”
This type imitates natural water bodies even more accurately. “Riffles” can be created using low-growing, creeping plants, as if the water is shallow. “Islands” are taller, accent plants or groups of shrubs that look like small islands amidst the floral flow.
- Advantages: Maximum naturalness, adds relief and volume.
- Examples: Low-growing alyssum and arabis as “riffles,” accent spherical thuja or lush peonies as “islands.”
4. River with Evening Fragrance
For those who love spending evenings in the garden, you can create a river of plants with a strong fragrance that is released in the evening. This will add a special charm and sensuality to your plot.
- Advantages: Magical aroma, creates a special atmosphere.
- Examples: Evening primrose (Oenothera), Matthiola, Nicotiana, Heliotropium.
5. Thematic River
You can create a river dedicated to a specific theme. For example, a river of medicinal herbs, a river of edible plants (spices, berries), or a river imitating wild meadows.
- Advantages: Functionality, originality, opportunity for experimentation.
- Examples: River of mint, lemon balm, sage; river of strawberries, blueberries, wild strawberries; river of chamomile, cornflowers, cereals.
Practical tip: Don’t be afraid to combine different types. For example, you can create a main rainbow river with several “islands” of ornamental shrubs. The main thing is that the composition looks harmonious and matches your vision of the garden. Think about the effect you want to achieve: create a peaceful corner for meditation or a bright accent that attracts attention. Your desires are the main guide!
Selecting Plants for a Flower River: Combinations of Color, Height, and Blooming Time
Creating a flower river is a true art where plants become your paints. To ensure your composition delights the eye for as long as possible and looks harmonious, it’s important to select the assortment wisely. I always advise starting by defining the basic principles of combination.
1. Color Palette
This is the first thing to consider. Will your river be monochrome, contrasting, or harmonious?
- Monochromatic schemes: Using different shades of one color (e.g., from light blue to dark blue). Creates a calming effect.
- Analogous schemes: Using adjacent colors on the color wheel (e.g., yellow, orange, red). Creates harmonious, pleasing transitions.
- Contrasting schemes: Using opposite colors (e.g., blue and orange, purple and yellow). Creates bright, dynamic accents.
Tip: Don’t overdo the number of colors. Usually, 3-4 main colors combined with shades of green look most advantageous. Use greenery as a background; it will help “tie” different colors together.
2. Plant Height
To create an effect of movement and depth, plants should be arranged according to the principle of “from high to low,” as if waves are rolling over each other.
- The tallest plants (e.g., delphiniums, echinacea, tall grasses) are planted in the center or on one side of the “river” if it’s along a path.
- Medium-height plants (e.g., hostas, peonies, daylilies) are placed around the tall ones or between them.
- Low-growing and groundcover plants (e.g., alyssum, arabis, thyme) are planted along the edges, creating the effect of “riverbanks.”
Important: Consider how the plants will look at the peak of their bloom. Some may grow significantly, others may bend to the ground due to wind or rain. Study the characteristics of each species.
3. Blooming Time
To ensure your flower river delights you with continuous blooming, select plants with different blooming periods.
- Early bloomers: Muscari, daffodils, tulips, primroses (spring).
- Mid-season bloomers: Peonies, irises, daylilies, campanulas (early-mid summer).
- Late bloomers: Asters, dahlias, rudbeckias, chrysanthemums (late summer-autumn).
Life hack: Plant bulbs among perennials. In spring, they will provide a bright start, and when they finish blooming and their foliage begins to yellow, they will be hidden by the overgrown perennials. In autumn, you can add seasonal annuals for bright accents.
4. Texture and Form
A variety of leaf textures and flower head shapes will add depth and interest to your river.
- Large leaves: Hostas, astilbes, rudbeckias.
- Small leaves: Carnations, thymes, alyssums.
- Delicate, lacy: Ferns, fern-like grasses.
- Lush inflorescences: Peonies, hydrangeas, roses.
- Spikes: Grasses, sage, lavender.
5. Sample Plant List for a Flower River (for a sunny spot):
- Tall: Delphinium, echinacea, liatris, hollyhock, grasses (Miscanthus, Calamagrostis).
- Medium: Peonies, daylilies, hostas (with decorative leaves), phloxes, helenium, rudbeckia, anastasia, astilbe.
- Low: Geranium, carnation, thyme, lavender, sedum (Hylotelephium), sedum, bacopa, lobelia, alyssum, arabis.
- Bulbs: Tulips, daffodils, muscari, crocuses.
Remember: Research information about each plant. Learn about its requirements for light, moisture, soil, and its mature size. This will help you avoid mistakes and create a truly harmonious composition.
Step-by-Step Instructions: How to Create a Flower River Yourself
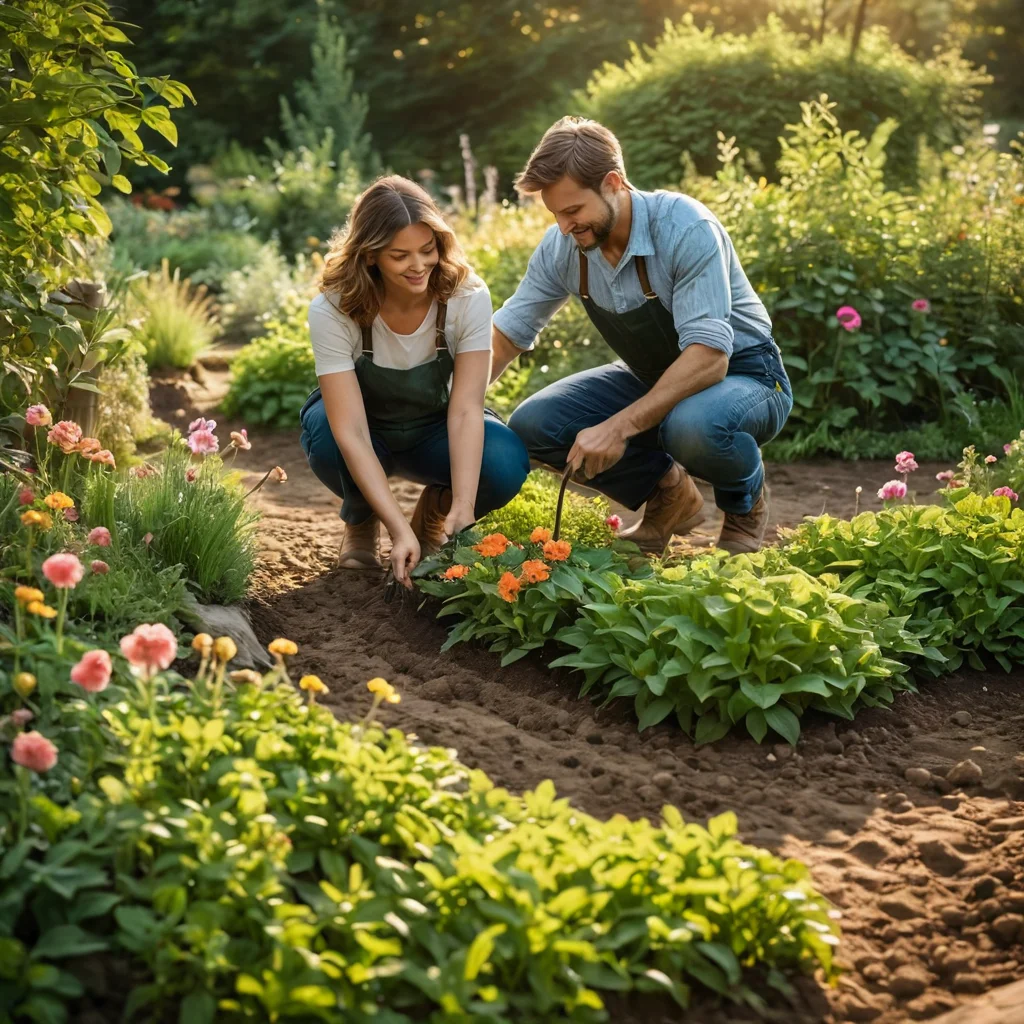
So, you’ve chosen a location, decided on the type of flower river, and selected the plants. Now it’s time to get to work! Creating a flower river is an exciting process that doesn’t require special construction skills, but it does require patience and attention. Follow this step-by-step guide, and you’ll succeed.
Step 1: Marking
First, you need to precisely mark the contours of your future river on the ground. Use the following for this:
- Flexible garden hose: Lay it on the ground, giving it the desired winding shape. This is the simplest and most visual method.
- Rope or cord: Stretch the rope along the marked contours.
- Sand or lime: Pour a thin layer of sand or sprinkle lime along the contours.
Tip: Don’t make the river too narrow. The optimal width is from 1 to 2 meters, so that the plants have enough space and you can easily care for them. Also, consider the smoothness of the curves – sharp turns can look unnatural.
Step 2: Soil Preparation
After the contours are marked, you need to prepare the soil. This stage is critically important for the health of your plants.
- Remove weeds: Thoroughly weed the entire area of the future flowerbed, removing not only the above-ground parts but also the weed roots.
- Dig the soil: Dig the soil deeply (to the depth of a spade), breaking up clumps.
- Improve soil structure: Depending on your soil type, add the necessary components. If the soil is clayey, add sand and compost. If it’s sandy, add peat, humus, and leaf mold. The goal is to create loose, fertile, and well-drained soil.
- Add fertilizers: Add a complex mineral fertilizer for flowering plants or organic fertilizers (compost, humus).
- Level the surface: Carefully level the prepared soil with a rake.
Important: If your plot has heavy clay soil or there’s a risk of water stagnation, consider installing drainage. You can line the bottom of the trench with a layer of gravel, broken bricks, or expanded clay.
Step 3: Planting Plan
Now that the soil is ready, it’s time to arrange the plants according to your plan.
- Place plants in containers: Arrange the pots with seedlings on the flowerbed, following your diagram. This will allow you to see how they look together and make adjustments before planting them in the ground.
- Maintain spacing: Consider the spacing needed between plants so they don’t hinder each other’s growth. This information is usually indicated on the seedling label.
- Arrange by height: Remember the rule – tall plants in the center or at the back, short ones at the edges.
- Group them: Don’t plant all plants individually. Groups of 3-5 identical plants look better, creating an effect of waves or flow.
Tip: Admire the composition from different angles. Ask a family member for their opinion. Sometimes a fresh perspective helps identify shortcomings.
Step 4: Planting
When you are completely satisfied with the arrangement, proceed with planting.
- Dig holes: The depth and width of the hole should correspond to the size of the plant’s root system.
- Carefully remove the plant from the container: Try not to damage the roots. If the roots are tightly tangled, you can gently loosen them.
- Place the plant in the hole: The root collar should be at ground level.
- Fill the hole with soil: Lightly compact the soil around the plant.
- Water: Water each planted specimen generously.
Step 5: Mulching
The final stage is mulching. This is a very important procedure that helps retain moisture, suppress weed growth, and improve soil structure.
- Choose material: You can use wood chips, bark, decorative gravel, compost, or peat.
- Spread the mulch: Apply a layer of mulch 5-7 cm thick around the plants, leaving a small space around the stem to prevent rotting.
Congratulations! Your flower river is ready. Now all that’s left is to wait for the plants to establish and start delighting you with their bloom.
Creating ‘Banks’ and a ‘Riverbed’: Decorative Elements and Materials
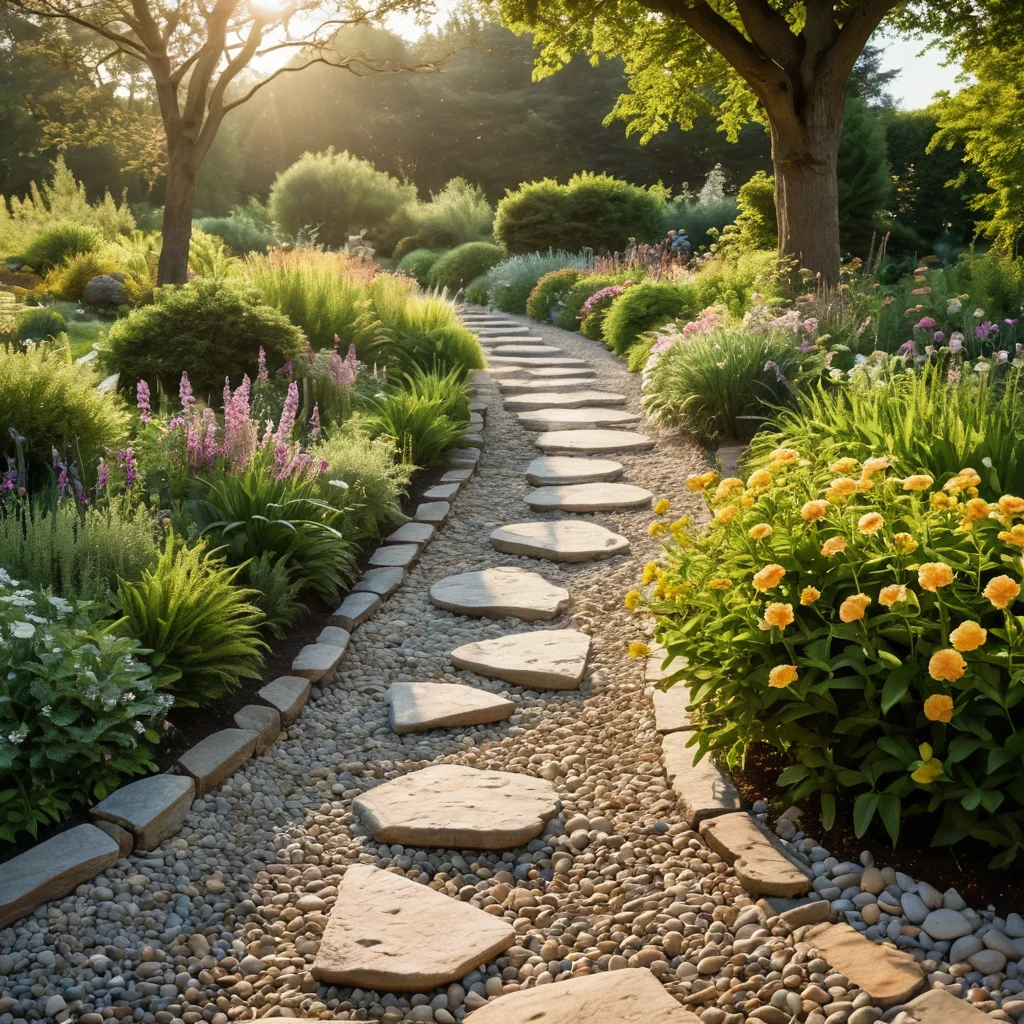
To make your flower river look as realistic and complete as possible, it’s important to pay attention to the design of its “banks” and “riverbed.” These elements not only add aesthetics but also help maintain the shape of the flowerbed, prevent soil erosion, and serve as additional decoration.
1. Materials for ‘Banks’
The choice of material depends on the overall style of your garden and your preferences. Here are a few popular options:
- Natural stone: This is perhaps the most natural and durable option. You can use flat boulders, granite or sandstone slabs, and pebbles. Stone banks will give your river a noble and monumental appearance.
- Advantages: Naturalness, durability, aesthetics.
- Disadvantages: High cost, labor-intensive installation.
- Wood: Wooden borders, wattle fences, or logs can give the garden a cozy, rustic look. It’s important to use treated wood that is resistant to rot.
- Advantages: Naturalness, coziness, relatively low cost.
- Disadvantages: Requires periodic maintenance (treatment with antiseptics), less durable than stone.
- Decorative brick or stone: Artificial analogues of natural materials, which are often easier to lay and more affordable.
- Advantages: Variety of shapes and colors, ease of installation, affordability.
- Disadvantages: Less durable than natural materials.
- Plastic edging: Flexible and easy to install, they are ideal for creating smooth curves. However, they may look less natural.
- Advantages: Flexibility, ease of installation, affordability.
- Disadvantages: Artificial appearance, can fade in the sun.
- Living hedge: Low-growing shrubs (e.g., boxwood, cotoneaster, lavender) can serve as natural, living borders.
- Advantages: Naturalness, adds greenery and texture.
- Disadvantages: Requires maintenance (pruning), can overgrow.
2. Decorating the ‘Riverbed’
The “riverbed” itself is the main part of the flowerbed, filled with plants. However, you can add other elements to make it more interesting:
- Decorative gravel or pebbles: Can be used to create “dry riverbeds” within the main flower river, or for accents between plant groups. Blue or blue stones, imitating water, look especially striking.
- Large stones or boulders: Placed among the flowers, they can imitate underwater rocks or create “islands.”
- Small decorative elements: Figurines of frogs, dragonflies, windmills, bridges (for very stylized rivers) can add playfulness. But here, the main thing is not to overdo it, so as not to create a tasteless effect.
- Water imitation: In some cases, to create a special effect, you can use transparent epoxy resin or special gel balls that imitate water. This is a more complex and expensive option, but it can be very effective.
3. Combination with Other Garden Elements
A flower river can be complemented by other landscape design elements:
- Bridges: A small decorative bridge over the river (if it’s wide enough) will add a fairy-tale touch.
- Lanterns: Garden lanterns placed along the river will create a magical atmosphere in the evening.
- Benches: A cozy bench near the river will be an ideal place to relax and admire.
- Water feature: If possible, a flower river can effectively flow into a small pond or stream, creating a unified water composition.
Tip: When choosing materials for “banks” and “riverbeds,” always consider the style of your house and garden. If you have a modern house, stricter lines and materials will be suitable. For a rustic style – natural, rough textures.
Caring for a Flower River: Watering, Fertilizing, and Seasonal Work
A flower river, like any other creation of nature (and human hands!), requires care. But don’t be intimidated, it’s not as difficult as it might seem. Regular, but not burdensome, care will keep your river lush, vibrant, and healthy throughout the season.
1. Watering
This is the foundation. The frequency and abundance of watering depend on:
- Weather: On hot, dry days, you’ll need to water more often and more abundantly. In cool and rainy weather – less often.
- Soil type: Light sandy soils require more frequent watering as moisture drains quickly. Heavy clay soils retain moisture longer.
- Plant species: Different plants have different moisture needs. Study the characteristics of each species.
General recommendations:
- Water plants early in the morning or late in the evening when the sun is less intense. This helps prevent leaf scorch and reduces moisture evaporation.
- Try to water at the base of the plants, avoiding getting water on the leaves and flowers.
- The soil should be moist, but not waterlogged. Check the moisture by inserting your finger a few centimeters into the soil.
Mulching is your best friend in maintaining optimal soil moisture and reducing watering frequency.
2. Fertilizing
For plants to bloom abundantly and develop well, they need nutrients. Fertilizing should be done throughout the growing season:
- Spring: After the snow melts and active growth begins, apply a complex mineral fertilizer with a predominance of nitrogen to stimulate green mass growth.
- During bud formation and flowering: Use fertilizers with a higher content of phosphorus and potassium. They promote abundant flowering and the formation of bright buds.
- Autumn: You can apply autumn fertilization with phosphorus-potassium fertilizers, which will help plants prepare for winter.
Important: Follow the instructions on the fertilizer packaging. Over-fertilizing can be as harmful as a lack of nutrients.
3. Weeding and Loosening
Regularly remove weeds that compete with your flowers for moisture and nutrients. After watering or rain, when the soil has slightly dried, gently loosen the top layer. This will improve air circulation to the roots and prevent the formation of a soil crust.
4. Pruning and Deadheading
- Removing faded inflorescences: Regularly remove faded flowers. This not only improves the appearance of the flowerbed but also stimulates plants to re-bloom, and prevents seed formation (if you are not planning to collect seeds).
- Formative pruning: Some plants (e.g., lavender, sage) require periodic pruning to maintain a compact shape and stimulate branching.
- Autumn pruning: Most perennials are pruned in autumn, leaving stems 10-15 cm above the ground. Some plants (e.g., ornamental grasses, echinacea) can be left to overwinter with decorative inflorescences, pruning them only in spring.
5. Winter Preparation
Depending on your region’s climate and the frost resistance of the plants, winter protection may be necessary:
- Mulching: Cover the base of the plants with dry peat, compost, or fallen leaves.
- Spruce branches: Use spruce or pine branches to cover particularly heat-loving plants.
- Special covering materials: Non-woven fabric (spunbond) or burlap.
Tip: Observe your plants. They will tell you themselves what they need. Successful care is primarily about attention and timely reaction to the needs of your green pets.
Common Mistakes When Creating a Flower River and How to Avoid Them

Even experienced gardeners sometimes make mistakes. Creating a flower river is a creative process, and it’s easy to stumble, especially if you’re doing it for the first time. But don’t worry, by knowing about common pitfalls, you can avoid them and create a truly impressive composition. Let’s look at the most frequent mistakes.
1. Incorrect Location Choice
Mistake: Planting a river in a too shady or, conversely, too windy spot, without considering the plants’ needs. Or choosing a location that is not easily visible.
How to avoid: Carefully analyze the sunlight on the plot throughout the day. Study the light and wind requirements of your chosen plants. Before starting work, “try on” the river in different areas, imagining how it will look from the house windows or the terrace.
2. Neglecting Soil Preparation
Mistake: Planting plants in unprepared, dense, poor soil, without removing weeds and ensuring drainage.
How to avoid: Spend time preparing the soil. Deep digging, adding compost or humus, improving drainage (if necessary) are investments in the health and beauty of your plants for years to come. Remove all weed roots – they can sprout again.
3. River Too Narrow or Too Wide
Mistake: Making the river so narrow that the plants are cramped, or so wide that it’s difficult to care for the plants in the center.
How to avoid: The optimal width is 1-2 meters. This allows for a beautiful arrangement of plants of different heights and provides convenient access for watering, weeding, and pruning.
4. Chaotic Plant Arrangement
Mistake: Planting plants in a single row or mixed haphazardly, without considering their height, shape, and blooming time.
How to avoid: Plan the planting in advance. Use the “high to low” principle, group plants (in groups of 3-5 of the same species) to create a sense of volume and movement. Create smooth color transitions.
5. Incorrect Plant Selection
Mistake: Choosing plants solely based on appearance, without considering their compatibility, care requirements, frost resistance, and longevity.
How to avoid: Create a plant list, studying their characteristics. Prefer perennials that will delight you year after year. Ensure that the chosen plants are compatible in terms of light, moisture, and soil type requirements. Remember seasonal blooming so that the river remains decorative for as long as possible.
6. Overuse of Decorative Elements
Mistake: Filling the river and its surroundings with too many stones, figurines, artificial materials, making the composition gaudy.
How to avoid: Decor should complement, not overload, the composition. Use it moderately to emphasize the natural beauty of the plants. Stone, wood, gravel are the best friends of a flower river. The main thing is harmony.
7. Neglecting Care
Mistake: Planting flowers and forgetting about them, hoping they will grow and bloom on their own.
How to avoid: Regular watering, weeding, fertilizing, deadheading – these simple procedures will significantly extend the life of your flower river and make it even more lush and beautiful. Don’t forget about winter preparation.
And finally: Don’t be afraid to experiment and learn from your mistakes. Gardening is a process full of discoveries. Your flower river is a reflection of your soul and your love for nature. Enjoy every step, and the result will surely please you!