Remember how in childhood you would run off to the nearest forest to hide from the whole world? That special smell of damp leaves, moist earth, the play of sunbeams through the dense crowns of trees, the quiet singing of birds… These are not just smells and sounds, they are a whole state of soul. What if I told you that a piece of this forest magic can be brought right to your plot, creating your own corner of nature where peace and harmony will reign? It’s not such a difficult task, believe my experience. Today we will embark on an exciting journey to create your personal “forest” oasis, which will become a favorite resting place for the whole family.
Why Create a “Forest” Corner on Your Plot: The Magic of Naturalness and Serenity
The idea of creating a corner on your plot that resembles a natural forest is becoming increasingly popular. And it’s no wonder! In our age of hustle and constant information noise, we increasingly value moments of silence, tranquility, and unity with nature. A “forest” corner is not just a trendy landscape design trend, it’s a whole world that can offer:
- Harmony and Serenity: Natural forms, muted colors, sounds of nature – all this contributes to relaxation and stress relief. It’s your personal power spot where you can recharge after a busy week.
- Beauty That Requires Little Maintenance: Unlike a strict formal garden, a “forest” corner implies greater naturalness. Plants here grow more freely, and compositions look as if they were created by nature itself. Of course, care is still needed, but it differs from the meticulous trimming of shrubs or regular replanting of flowers.
- A Sense of Mystery and Fairytale: Winding paths, shady nooks, thickets of ferns and mosses – all this creates an atmosphere of mystery, as if you’ve stepped into a magical forest from a childhood fairytale.
- Diversity of Flora and Fauna: A well-organized “forest” corner can attract beneficial insects (bees, bumblebees), birds, and sometimes even hedgehogs or other small inhabitants. It’s a real mini-ecosystem at your home.
- An Inexhaustible Source of Inspiration: Observing the changing seasons in your “forest” corner is a special pleasure. From delicate greenery in spring to golden attire in autumn and snow-covered branches in winter.
- Practicality and Affordability: Often, natural materials found in nature (cones, branches, stones) can be used to create such a corner, as well as plants that thrive in shade and don’t require special care. It’s a great way to implement DIY garden decor ideas without significant expense.
Believe me, creating such a place on your plot is not only an investment in beauty but also in your peace of mind. It’s an opportunity to slow down, enjoy the moment, and feel like a part of the larger natural world.
A “Forest” Corner with Your Own Hands: Choosing a Style and Concept for Your Garden
Before you grab a shovel, let’s decide what kind of “forest” corner you want to see. There’s no single rule, as the main thing is that you like it and it harmoniously fits into the overall style of your plot. Here are a few popular directions to help you decide:
- Mediterranean Forest: Imagine the scent of cypresses, slender olive trees, lush shrubs, and perhaps even a small fountain with trickling water. The palette here is lighter, with the addition of silvery leaves and warm stone tones.
- Northern (Scandinavian) Forest: This is the realm of conifers – pines, spruces, junipers. Minimal bright colors, emphasis on the textures of bark, needles, moss. Use of natural wood, stone, rough fabric. An atmosphere of calm and conciseness.
- Russian Forest: Birches, oaks, rowan trees, aspens. Here you can add bright spots of wildflowers, use natural materials for decor – wood slices, stumps, snags. Elements of rustic style are possible.
- Tropical Forest (or its imitation): If you have a warm climate or are ready for experiments, you can create a corner with large leaves, lush ferns, and vines. Humidity and protection from direct sunlight are important here.
- Minimalist “Forest” Corner: A few striking conifers, a few unusually shaped stones, a gravel path. Emphasis on the shape and silhouette of the plants.
Important questions to ask yourself:
- Plot Size: For a small plot, it’s better to choose more compact plants and avoid overly massive compositions. For a large area, you can go all out and create a whole glade or even an imitation of a forest edge.
- Lighting: Will your future “forest” corner be in shade, partial shade, or sun? The choice of plants directly depends on this. Most “forest” plants prefer diffused light.
- Humidity: Are there natural low-lying areas on the plot where water stagnates, or conversely, is it dry? This is also important when selecting vegetation.
- Presence of Existing Elements: Perhaps you already have an old tree that can be incorporated, or a picturesque slope that is ideal for creating a “forest” atmosphere.
- Your Personal Style: What do you expect from this corner? A place for meditation, a children’s play area, a romantic garden for two, or just a picturesque spot for photo shoots?
In my opinion, the best approach is a mix of styles, while maintaining overall natural harmony. Don’t be afraid to experiment and listen to your heart. After all, it’s your garden, and only you decide what it will be like.
What Plants Are Suitable for a “Forest” Corner: From Ferns to Coniferous Giants
The heart of any “forest” corner is, of course, the plants. They create the right atmosphere, texture, and color palette. I always advise starting by choosing plants based on the lighting and humidity conditions of your future corner. Don’t try to plant everything at once; it’s better to gradually add new species, observing how they feel.
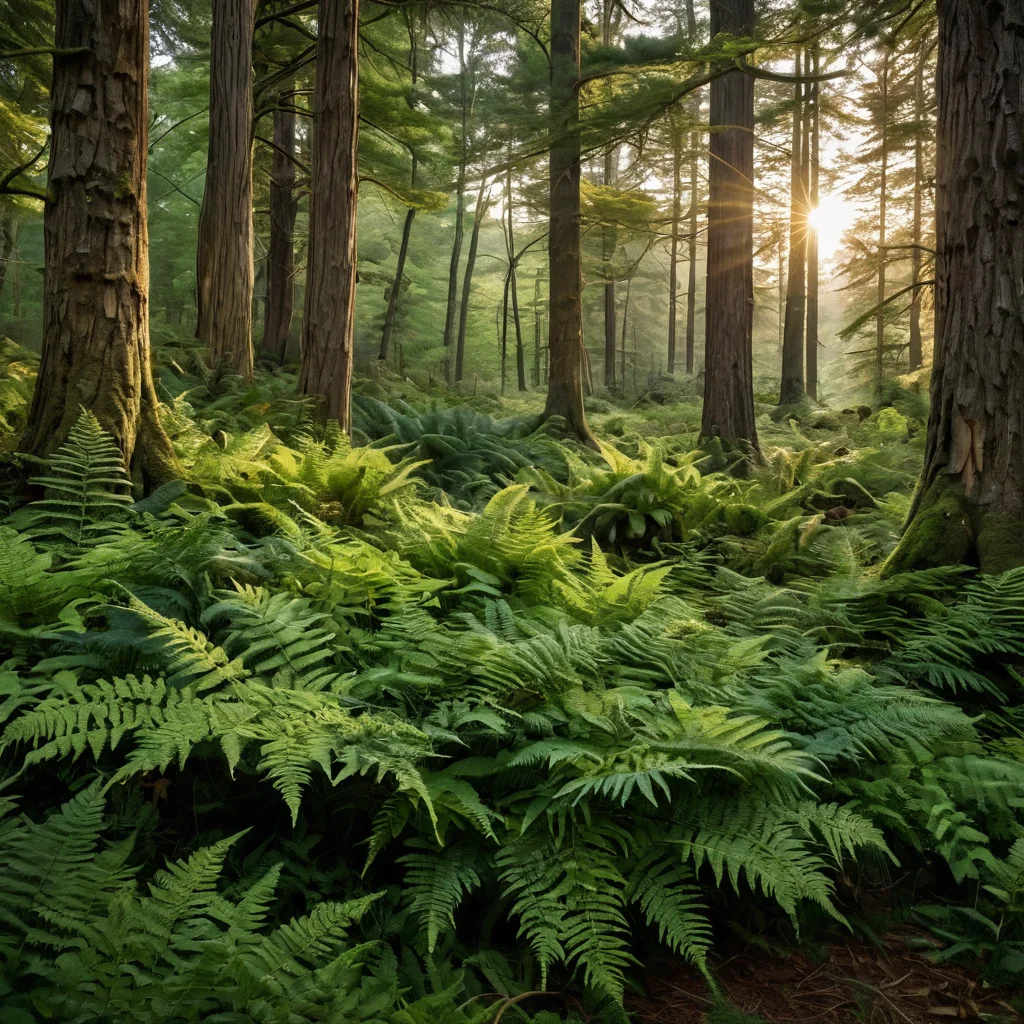
Coniferous Plants – The Basis of a “Forest” Landscape
It’s almost impossible to imagine a forest corner without conifers. They create the framework of the composition, please the eye year-round, and add that “coniferous” freshness.
- Spruce: From tall columnar forms (e.g., Norway spruce ‘Cupressina’) to compact globular ones (Blue spruce ‘Glauca Globosa’). Choose varieties that fit the size.
- Pine: Scots pine, mountain pine (especially its dwarf varieties like ‘Mops’ or ‘Gnom’), European stone pine. Their textured needles and picturesque crowns look great.
- Larch: A remarkable conifer that sheds its needles in winter. Its delicate green needles in spring and golden in autumn are a song in themselves. Ideal for creating lightness.
- Juniper: Groundcover (horizontal) forms – ‘Wiltonii’, ‘Blue Chip’ – create picturesque carpets spreading along the ground. Upright varieties – ‘Skyrocket’, ‘Stricta’ – will add vertical accents.
- Arborvitae: Columnar and pyramidal varieties (e.g., Eastern arborvitae ‘Smaragd’, ‘Brabant’) look especially good, imitating small forest trees.
Decorative Trees and Shrubs – Creating Volume and Structure
These plants will help create denser plantings, add variety in shapes and colors.
- Birch: White-barked beauties, such as weeping birch (‘Youngii’ – a weeping form) or downy birch, instantly create a sense of a Russian forest.
- Rowan: With its lacy foliage and bright clusters of berries in autumn. Common rowan or its decorative forms are particularly striking.
- Willow: Weeping willow varieties (e.g., Goat willow ‘Kilmarnock’) or creeping shrubs will add romance and picturesqueness.
- Maple: Some maple species, such as Tatar maple (‘Acer tataricum’) or Norway maple (‘Acer platanoides’ – especially its purple forms), can become interesting accents.
- Hydrangeas: Especially panicle and tree hydrangeas, which thrive in partial shade and bloom profusely in summer, adding color.
- Rhododendrons and Azaleas: If you have acidic soil, these beauties will be the highlight of your “forest” corner, impressing with their abundant spring blooms.
- Ornamental Apples and Cherries: Their spring blossoms and autumn fruits will add charm.
Shade-Tolerant Perennials – Filling the Space with Greenery and Textures
These are plants that will become the “filler” for your “forest” garden, creating a lush green carpet and adding interesting textures.
- Ferns: Ostrich fern, shield fern, common ostrich fern – their ornate fronds are simply made for creating a mysterious atmosphere.
- Hostas: Queens of the shade! A huge variety of leaf shapes, sizes, and colors – from bluish-green to bright green, from blue to yellow, with or without a border.
- Astilbe: Its fluffy plumes of flowers (white, pink, red) will liven up even the shadiest corner in summer.
- Bleeding Heart: Amazing heart-shaped flowers that appear in spring.
- Lily of the Valley: A classic of forest clearings, adding a spring fragrance.
- Brunnera: With its silvery leaves (‘Jack Frost’ is one of the most striking) and blue forget-me-not flowers in spring.
- Solomon’s Seal: Elegant arching stems with white bell-shaped flowers.
- Geranium (perennial): Various types of geranium look great in partial shade, creating bushy clumps.
- Mosses: If you have damp, shady spots, moss will be the best decoration.
Annuals for Accents (Optional)
If you want to add bright colors, you can use unpretentious annuals that love partial shade:
- Impatiens: Blooms profusely all summer.
- Begonia: Beautiful both for its blooms and decorative leaves.
- Lobelia: For creating blue or light blue accents.
Tip: When choosing plants, pay attention to their requirements for humidity and lighting. It’s best to choose plants that naturally grow in similar conditions. And remember the principle of “the simpler, the better.” Plants that don’t require complex care, shaping, or constant attention are ideal for a “forest” corner.
Materials for a “Forest” Corner: Natural Stones, Wood, and Natural Decor

To make your “forest” corner look truly natural and harmonious, it’s important to choose the right materials. Forget plastic and artificial imitations – nature reigns here. Natural materials are the foundation.
Stones – Natural Sculptures
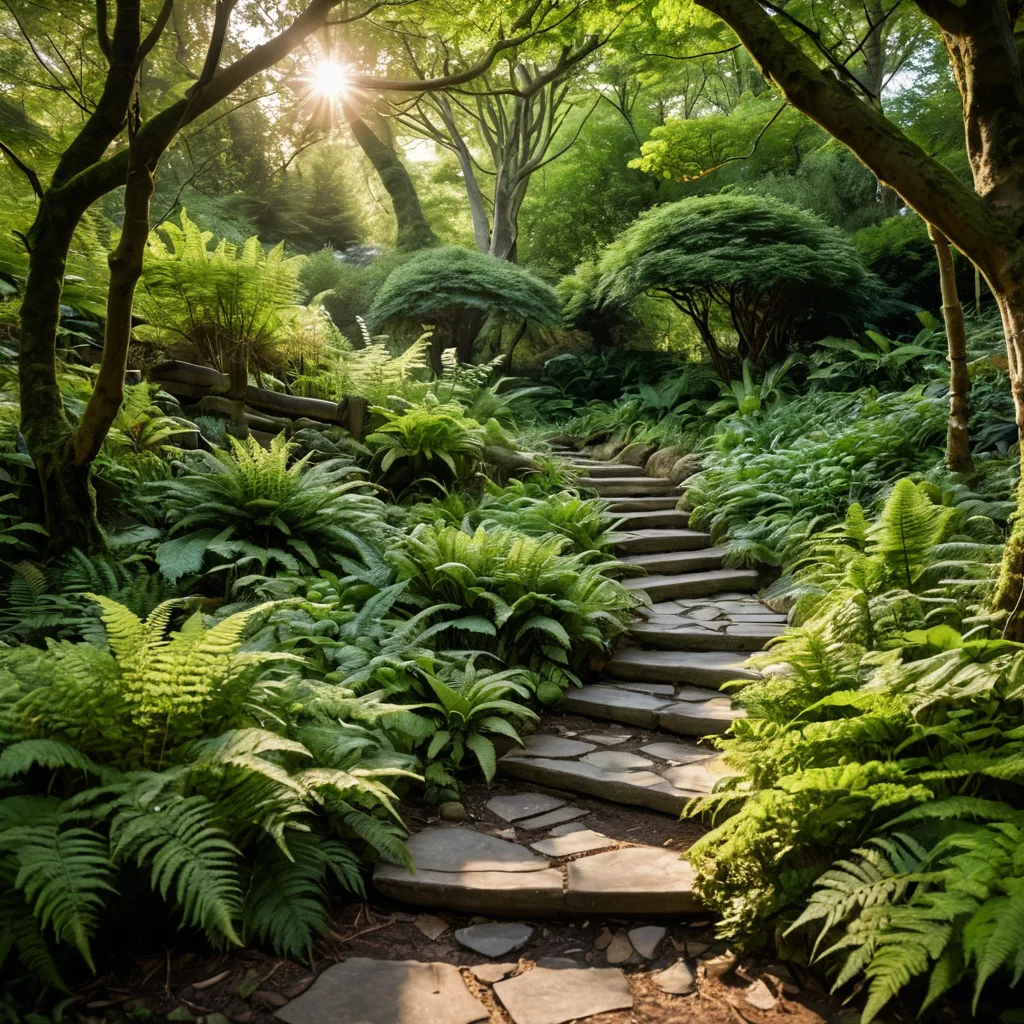
Stones can serve as both functional elements (e.g., for creating a rock garden or edging paths) and simply as decorative accents.
- Large Boulders: A few massive, irregularly shaped stones can become central elements of the composition, imitating natural rock outcrops.
- Pebbles and Gravel: Ideal for path design, drainage, or simply decorative mulching around plants. Use different sizes and shades.
- Slate, Sandstone: Flat stones can be used for paving, creating small retaining walls, or simply as plant stands.
- Natural Stone for Rock Gardens: If you plan to create a small hill or mound, choose stones of appropriate texture and color.
Tip: Don’t be afraid to use stones of different shapes and sizes, but try to ensure they match in color and texture. You can look for interesting stones in the forest, on the riverbank, or buy them at garden centers.
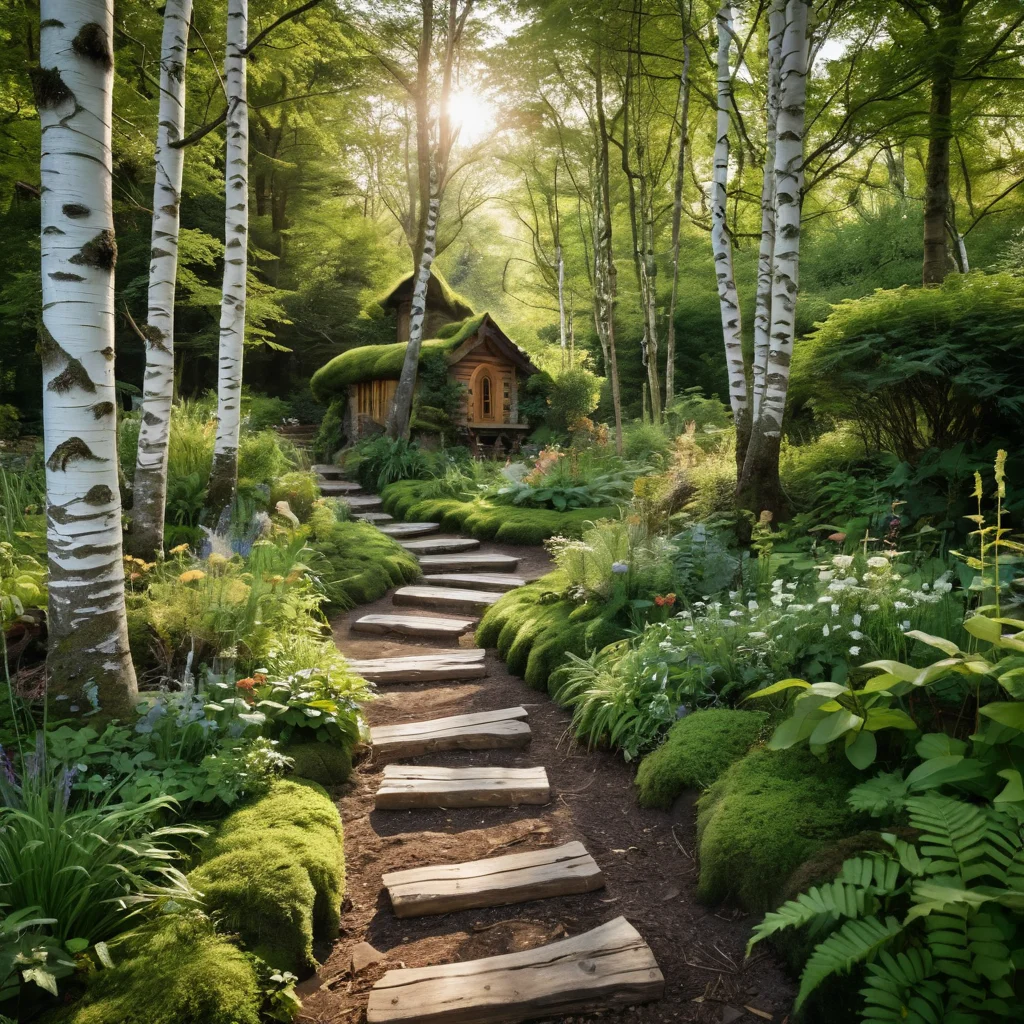
Wood – Warmth and Coziness of Nature
Wood perfectly complements greenery and stone, adding coziness and completeness.
- Wood Slices and Stumps: Can serve as original plant stands, tables, or simply decorative elements.
- Snags and Branches: Look for picturesque snags with unusual shapes. They can become real art objects in your “forest” corner.
- Wooden Bridges: If you have a small stream or just a damp low-lying area, a small wooden bridge will add charm.
- Pergolas and Gazebos (wooden): If space allows, you can install a small wooden pergola, entwined with ivy or clematis, or a cozy gazebo.
- Fences and Borders: Small decorative fences made of natural wood (e.g., from twigs) or pickets can define the boundaries of the area.
Tip: Treating wood with protective agents (varnishes, impregnations) will extend its lifespan, but try to choose agents that do not significantly alter the natural color and texture of the wood.
Other Natural Materials and Decor
- Pine Cones: Large pine cones are an excellent material for decoration. They can be used for mulching, creating compositions, or simply placed among plants.
- Bark: Decorative bark (pine, larch) is an excellent mulching and decorative ground cover.
- Dry Leaves: Don’t rush to remove all fallen leaves. They can serve as a natural winter cover for plants and a beautiful element of autumn decor.
- Dry Grasses and Cereals: Dried stalks of cereals or grasses with seeds will add autumn romance and attract birds.
- Glass Elements (Optional): Small glass balls, interestingly shaped bottles, or even old glass jars can create the effect of sunbeams or add mystery, especially if illuminated.
- Ceramics (Use Sparingly): Small ceramic pots or animal figurines (e.g., a hedgehog, a frog) can be cute accents, but it’s important not to overdo it so as not to disrupt the naturalness.
The main rule: Use what you have on hand, what you like, and what harmonizes with the surrounding nature. DIY garden decor ideas often arise from the simplest natural materials.
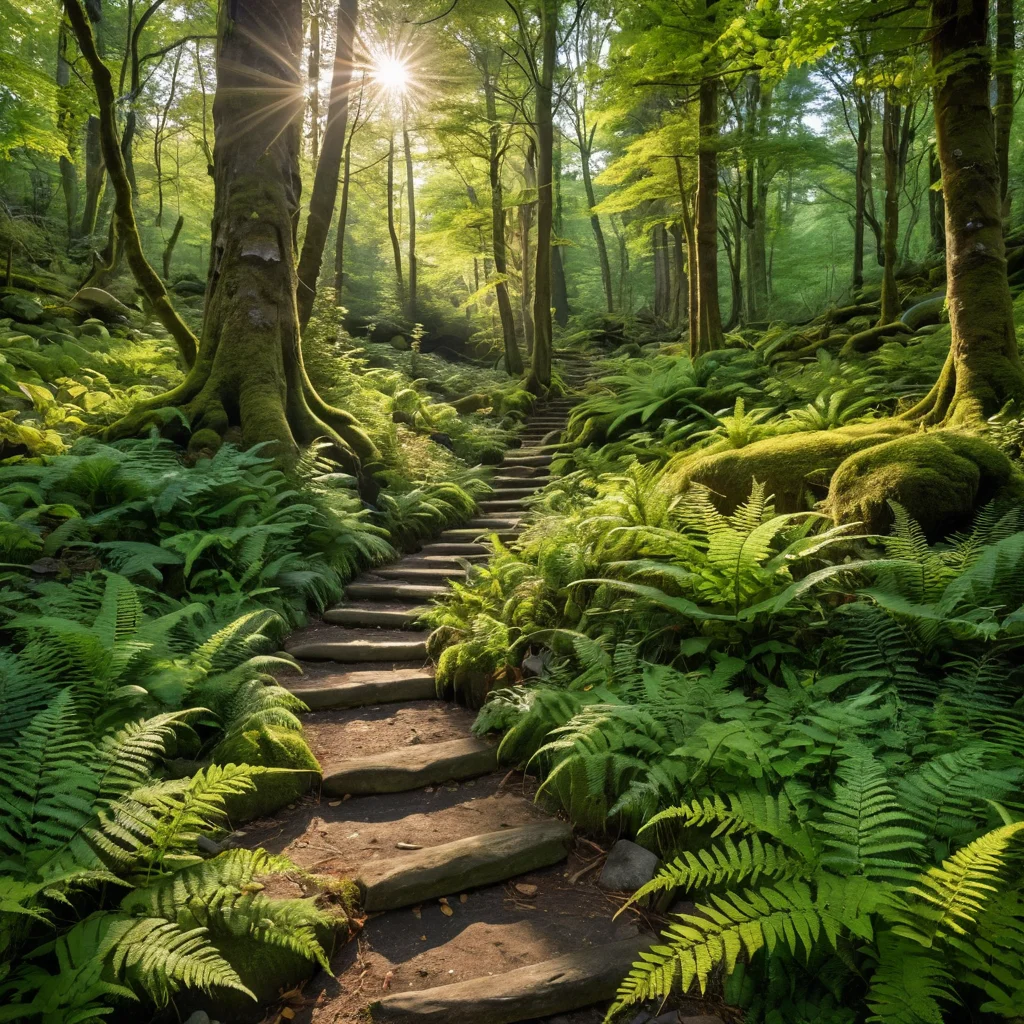
Step-by-Step Instructions: How to Arrange a “Forest” Corner on Your Plot (Even a Small One)
Creating a “forest” corner is a process that requires planning and gradual implementation. Even in a small plot, you can create a cozy forest atmosphere. Here’s a step-by-step plan to help you bring this dream to life:
Step 1: Determining the Location and Size
Choose a suitable area on your plot. Ideally, it should be a partially shaded spot, perhaps with existing trees or shrubs that can be incorporated. Determine the approximate size of the future corner. It can be a small cozy glade or a more extended area along the fence or house.
Step 2: Planning the Composition
Draw a rough plan on paper. Consider where the following will be located:
- Large Plants (Trees, Shrubs): They will form the basis of the composition.
- Perennials: To create a “carpet” under trees and shrubs.
- Paths: Made of gravel, bark, wood slices, or tiles.
- Decorative Elements: Stones, snags, benches.
- Possible Ponds or Streams: If planned.
Tip: Try to avoid straight lines and symmetry. Nature loves smooth curves and natural asymmetry.
Step 3: Soil Preparation
Depending on the chosen plants, soil preparation may be necessary. For most shade-loving plants, loose, well-drained soil is suitable. “Forest” plants often prefer slightly acidic or neutral pH.
- Digging: Carefully dig over the chosen area.
- Fertilizing: Add compost or humus to improve soil structure.
- Drainage: If the area is damp, ensure drainage using gravel or crushed stone.
Step 4: Planting
Start by planting the largest plants – trees and shrubs. Then move on to perennials. Pay attention to the spacing between plants, considering their future size.
- Large Specimens: Plant trees and shrubs, considering their adult size.
- Perennials: Plant groups of plants, creating “patches” of greenery.
- Color Accents: Place bright flowers (e.g., astilbe, bleeding heart) so they attract attention.
- Creating a “Carpet”: Plant low-growing plants (hostas, brunneras, mosses) to fill the space between larger plants.
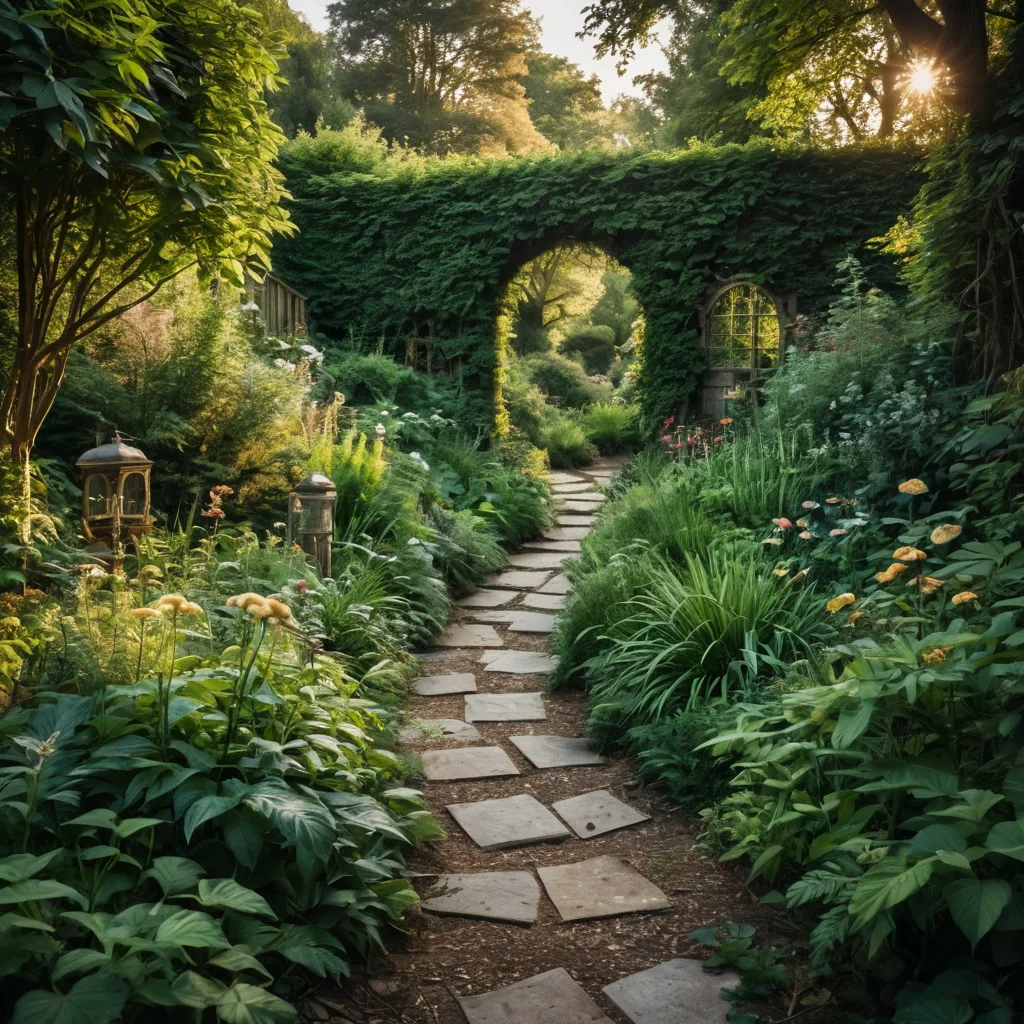
Step 5: Laying Paths
Lay out paths using your chosen materials. These can be:
- Gravel or Crushed Stone: Easy to lay, good drainage.
- Bark Mulch: Creates a soft surface, looks good.
- Wood Slices: Original, but requires more maintenance.
- Stone Slabs: For a more solid look.
Important: Paths should be wide enough to walk comfortably and slightly winding to emphasize naturalness.
Step 6: Placing Decorative Elements
Arrange stones, snags, stumps, install a bench or garden figurine. The key here is not to overdo it. Let each element be in its place and look harmonious.
Step 7: Mulching
Cover the soil around the plants with mulch: bark, wood chips, fallen leaves. This will help retain moisture, prevent weed growth, and give a finished look.
Step 8: Final Touches
Water the planted plants, remove construction debris. Your “forest” corner is ready! Now all that’s left is to wait for the plants to grow and fill it with life.
Important nuance for small plots: Use vertical gardening (climbing plants on supports), compact plant varieties, and try to create a multi-level composition. Even a small corner with a couple of beautiful shrubs, ferns, and decorative stones can look very impressive.
Creating Atmosphere: Lighting, Ponds, and Small Architectural Forms for a “Forest” Corner
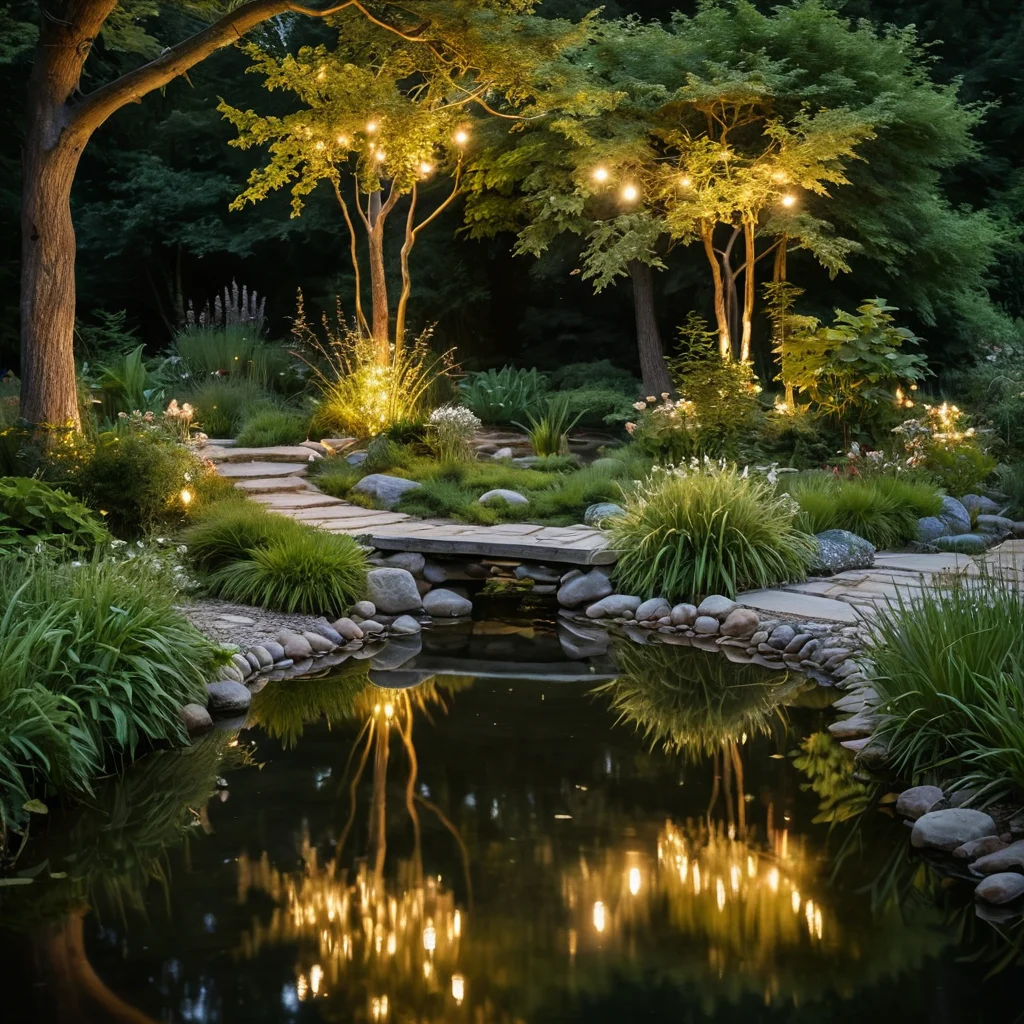
To make your “forest” corner truly cozy and magical, it’s important to consider the details that create atmosphere. Lighting, water, and architectural elements can transform even the simplest composition.
Lighting – The Magic of Light and Shadow
Properly organized lighting can emphasize the beauty of plants, create coziness in the evening, and ensure safe movement.
- Decorative Lighting: Use small solar-powered lanterns, warm light garlands, LED strips. They can be placed along paths, in tree crowns, or among shrubs.
- Accent Lighting: Directional spotlights will help illuminate interesting plants, stones, or sculptures. This will create a play of light and shadow, making the corner mysterious.
- Safety: A few small lights along the main path will ensure safe movement after dark.
- Candles (for special occasions): If you plan to spend evenings in the “forest” corner, you can use garden candles in lanterns.
Tip: Choose lighting with a warm, soft light. Cold light will disrupt the natural atmosphere. Use timers or motion sensors for automatic light activation.
Water Features – Life-Giving Moisture and Soothing Sound
Even a small water feature can transform your “forest” corner, adding life and freshness.
- Mini-Pond: A small pond made from a ready-made basin or dug and waterproofed. Plant moisture-loving plants along the edges, add aquatic plants (water lilies, cattails).
- Stream: An imitation of a natural stream with stones and pebbles. A pump can be used to create the effect of flowing water.
- Waterfall: A small cascading waterfall flowing over stones will create a pleasant, calming sound.
- Fountain: A small fountain with gentle trickling water.
- Zen Garden with Water: You can create a miniature rock garden with a small water reservoir imitating a pond.
Tip: If you’re not ready for a full-fledged water feature, start with a small decorative fountain or even just a large beautiful water bowl with floating flowers.
Small Architectural Forms – Coziness and Functionality
Elements that make the corner more lived-in and comfortable.
- Garden Bench: Made of wood, stone, or metal. Choose a model that harmoniously fits your “forest” style.
- Small Table: For tea or reading.
- Arched Structures, Pergolas: If possible, install a small pergola entwined with ivy or clematis.
- Decorative Bridges: Even over a dry streambed or a small depression.
- Sculptures and Figurines: Small figurines stylized to resemble nature – animals, gnomes (if you like that style), or abstract compositions of stone and wood.
- Bird Feeders: Will add life to your corner.
Tip: All elements should be made of natural materials and not disrupt the overall natural harmony. The goal is to create the feeling that you have entered a real, but well-maintained, piece of forest.
Caring for a “Forest” Corner: How to Maintain Natural Beauty Year-Round

Despite its apparent naturalness, a “forest” corner still requires some care. The main thing is not to overdo it and to act in harmony with nature. Believe my experience, proper care will keep your corner beautiful and healthy year-round.
Spring: The Awakening of Nature
- Cleanup: Carefully remove remnants of winter cover, dry leaves, and branches.
- Pruning: Perform sanitary pruning of trees and shrubs, removing dry, damaged, or diseased branches.
- Fertilizing: Apply complex fertilizers for ornamental plants, especially if the soil is poor.
- Weeding: Remove emerging weeds before they gain strength.
- Planting: Time to plant new plants if you planned an expansion.
Summer: Active Growth and Blooming
- Watering: During dry periods, plants, especially young ones, need regular watering. It’s better to water abundantly but less frequently.
- Weeding: Continue to remove weeds, especially at first, until the perennials have grown and covered the soil.
- Loosening: Gently loosen the soil around the plants to ensure air access to the roots.
- Fertilizing (Optional): If plants look weakened, you can provide additional feeding.
- Pest and Disease Control: Regularly inspect plants. At the first signs of infestation, use appropriate protective measures (preferably biological).
- Deadheading: For some plants (e.g., astilbe), this can prolong flowering or prepare them for winter.
Autumn: Preparing for Winter
- Cleanup: Remove fallen leaves from paths and lawns, but don’t rush to remove all leaves from under bushes – they will serve as natural cover.
- Fertilizing: Apply phosphorus-potassium fertilizers, which will help plants prepare for winter.
- Watering: Continue watering plants until the first frost, especially evergreens.
- Protection (if necessary): Some heat-loving plants may need winter protection.
- Planting: Autumn is an excellent time for planting many perennials and conifers.
Winter: A Time of Rest
- Snow Removal: Gently brush snow off conifer branches so they don’t break under its weight.
- Inspection: Check the condition of winter protection (if any).
- Planning: Winter is a great time for planning new plantings and changes for the upcoming season.
Tip: In a “forest” corner, try to use natural care methods. Instead of chemical fertilizers – compost, instead of aggressive pesticides – biological agents or folk remedies. Leave some fallen leaves and dry branches – this creates a natural environment and serves as shelter for small inhabitants.
Common Mistakes When Creating a “Forest” Corner and How to Avoid Them
Even with the most sincere desire to create a beautiful “forest” corner, you can make mistakes that will spoil the overall impression. I’ve gathered the most common ones for you so you can avoid them.
- Excessive Decor: The desire to decorate everything at once leads to chaos. Too many figurines, stones, artificial elements disrupt natural harmony. Solution: Use minimal decor, choose natural materials, and place them as if they appeared there on their own.
- Incorrect Plant Selection: Choosing plants that are not suitable for the lighting or humidity conditions, or that don’t combine well with each other. This leads to plants growing poorly, getting sick, or dying altogether. Solution: Carefully study the requirements of each plant for growing conditions. Start with unpretentious species that are guaranteed to thrive.
- Too Many Bright Colors: A “forest” corner is, first and foremost, about greenery, textures, and muted shades. Too many bright, garish colors disrupt the atmosphere. Solution: Use bright colors as accents, preferring pastel tones or white flowers.
- Use of Artificial Materials: Plastic figurines, artificial stones, bright colored mulch – all of this destroys naturalness. Solution: Prefer natural materials: wood, stone, bark, gravel.
- Forgotten Paths: Lack of clearly defined, yet natural paths. When people walk directly on flowerbeds, they trample plants and disrupt the composition. Solution: Be sure to plan and create convenient paths that are harmoniously integrated into the landscape.
- Ignoring Scale: Using plants that are too large in a small area or, conversely, too small details in a large space. Solution: Relate the size of plants and decorative elements to the size of your plot.
- Lack of Care: Complete abandonment of care. Even a “wild” corner requires attention: weeding, watering (if necessary), sanitary pruning. Solution: Schedule time for minimal but regular care.
- Overcrowding: Planting plants too densely, leaving no room for growth. This leads to competition, diseases, and loss of decorative qualities. Solution: Leave enough space between plants, considering their future size.
Creating a “forest” corner is a creative process. Don’t be afraid to make mistakes, as every mistake is a valuable lesson. The main thing is to do it with love for nature and a desire to create your own little paradise on earth. Good luck with your gardening endeavors!