I remember as a child, running barefoot through my grandmother’s garden, I loved exploring every corner. I was especially fascinated by small hills covered with stones and whimsical plants. It seemed like they were entire worlds where tiny fairy-tale creatures lived. This captivating image still lives in my memory, reminding me of the magic of nature and the simplicity that so often surrounds us. Today, I want to share with you the secrets of creating a similar magical corner on your plot – it’s the so-called “snake” in the garden. It’s not just a flowerbed, it’s a true work of art that will add relief, dynamism, and charm to your plot.
What is a Garden “Snake” and Why is it Needed? Ideas for Inspiration
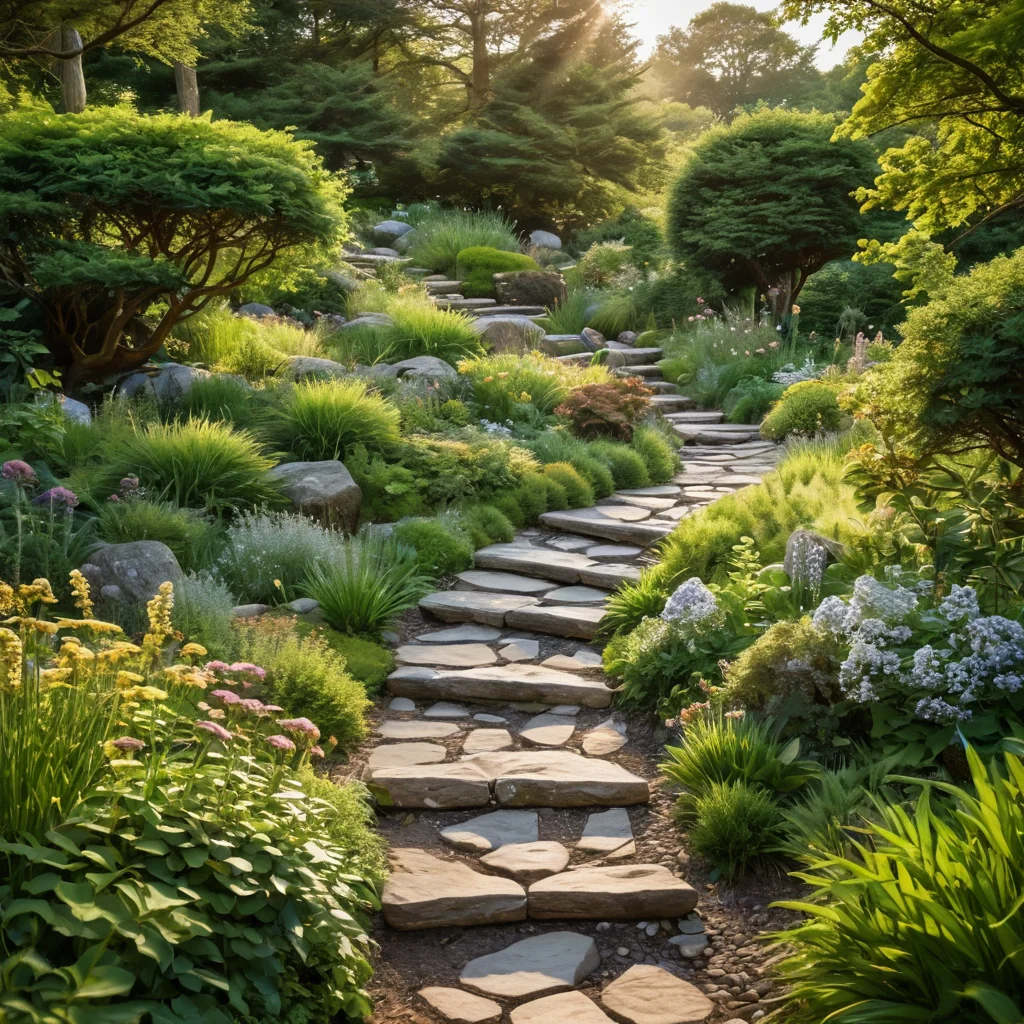
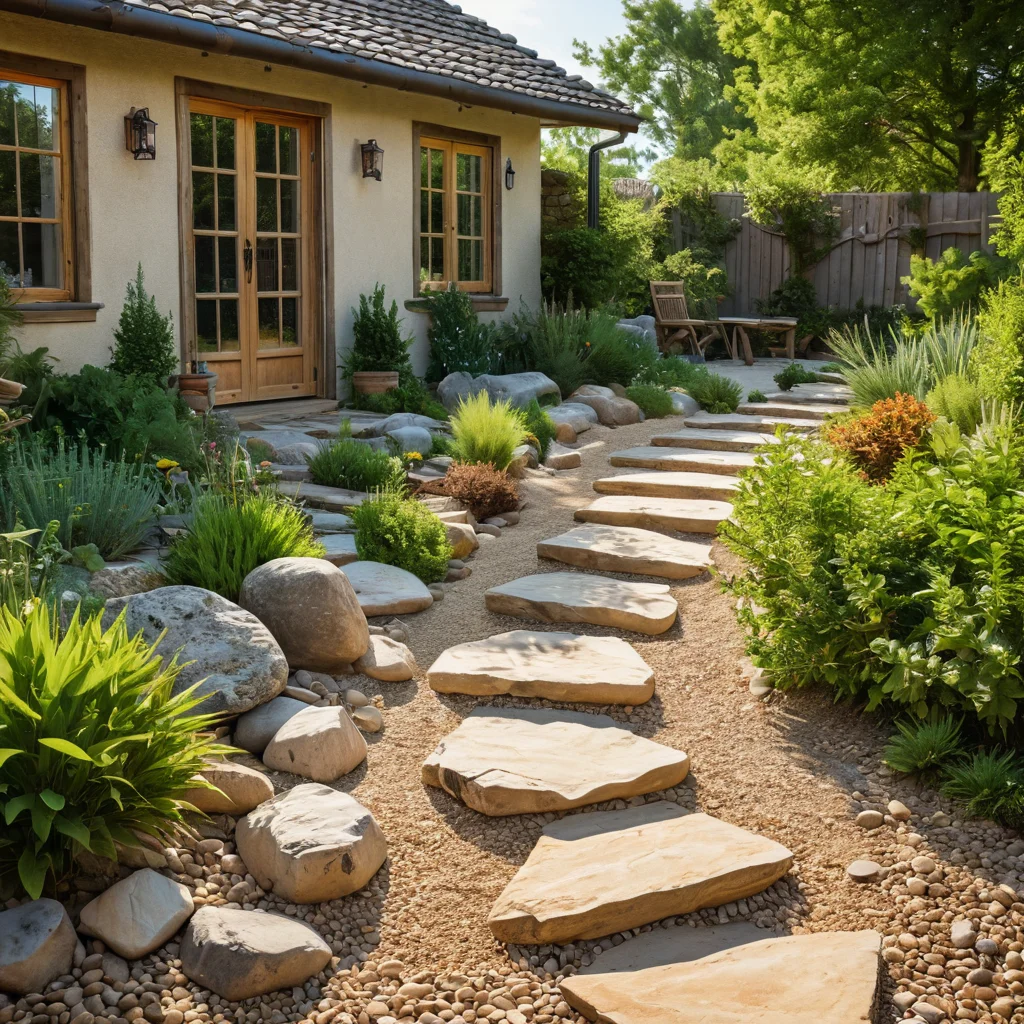
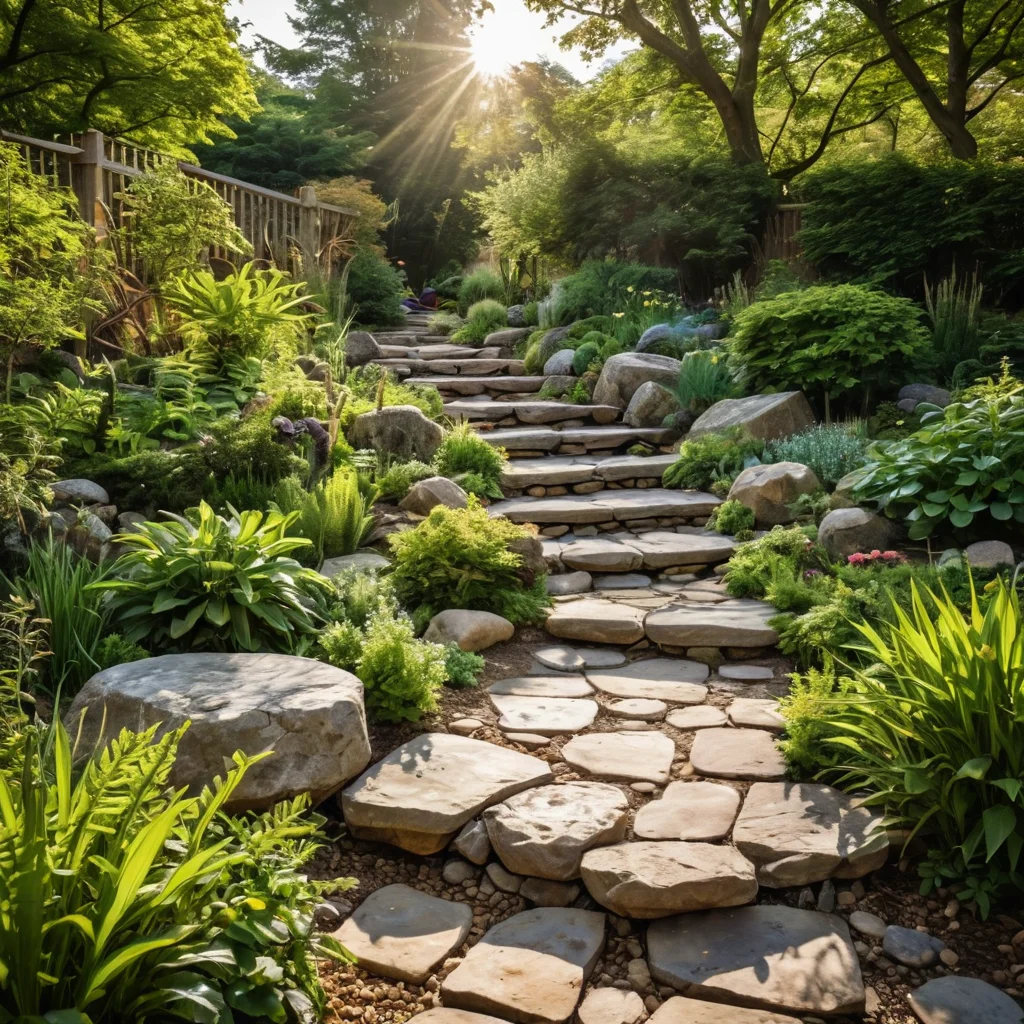
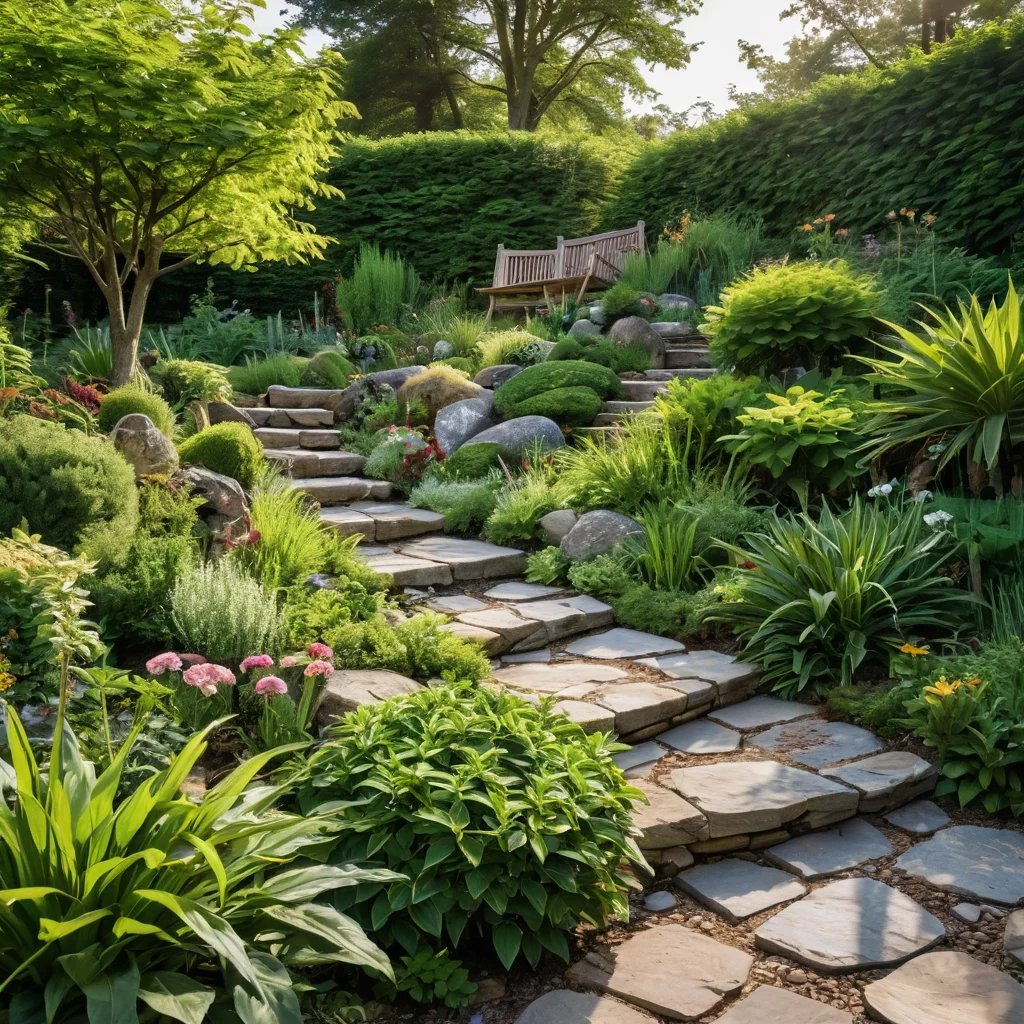
A “snake” in garden design is essentially an elongated, winding raised flowerbed or a small rock garden that imitates natural terrain. Its main feature is smooth, wavy lines reminiscent of a snake’s curves, hence the name. Such a composition beautifully enlivens a flat area, adding volume and depth. It can become the central element of the garden or elegantly fit into an existing landscape, for example, winding around a tree, a gazebo, or leading to a pond.
Why is such a “snake” needed? There are many reasons:
- Decorative Function: It’s a bright accent that attracts attention. The winding shape makes the flowerbed more dynamic and interesting than a regular straight bed.
- Zoning Space: A “snake” can serve as a visual separator between different garden zones, for example, between a relaxation area and a vegetable garden, or smoothly transition from one part of the plot to another.
- Practical Use: On raised sections, “snakes” improve drainage, which is especially important for plants that dislike waterlogging. The root system is better aerated, and the soil warms up faster in spring.
- Creating a Microclimate: Different levels of stones and plants form diverse micro-zones with varying humidity and light, allowing for a wider range of plants to be grown.
- Opportunity for Creativity: A “snake” is a canvas for your self-expression. You can use various stones, combine plants by color, shape, and texture, creating unique compositions.
I always say that a garden is a reflection of our soul. And a “snake” provides a wonderful opportunity to express this soul, to add a little magic and naturalness. Imagine: the morning sun breaks through the foliage, illuminating the play of stones and the delicate petals of flowers arranged along a winding hill. The air is filled with the aromas of herbs and flowers. Isn’t that a miracle? It’s an invitation for butterflies and bees, a place where you want to stop and simply enjoy the moment.
Types of Snake Hills: From Mini Mixborder to Large-Scale Landscape
The term “snake” is quite broad, and it can be implemented on various scales, depending on your desires, the size of the plot, and the garden style. Let’s look at the main options:
1. Mini Mixborder “Snake”
- Description: This is a small, compact option that is ideal for small plots, for bordering or narrow spaces. It is a narrow, winding flowerbed, usually no more than 50-70 cm wide.
- Features: Often created without significant elevation of the ground level, more like a raised bed with an emphasis on stones and plants. It can smoothly transition from one zone to another.
- Application: Looks great along paths, around trees, at the entrance to the house, and can also be used to divide garden beds.
2. Medium-Sized “Snake” Rock Garden
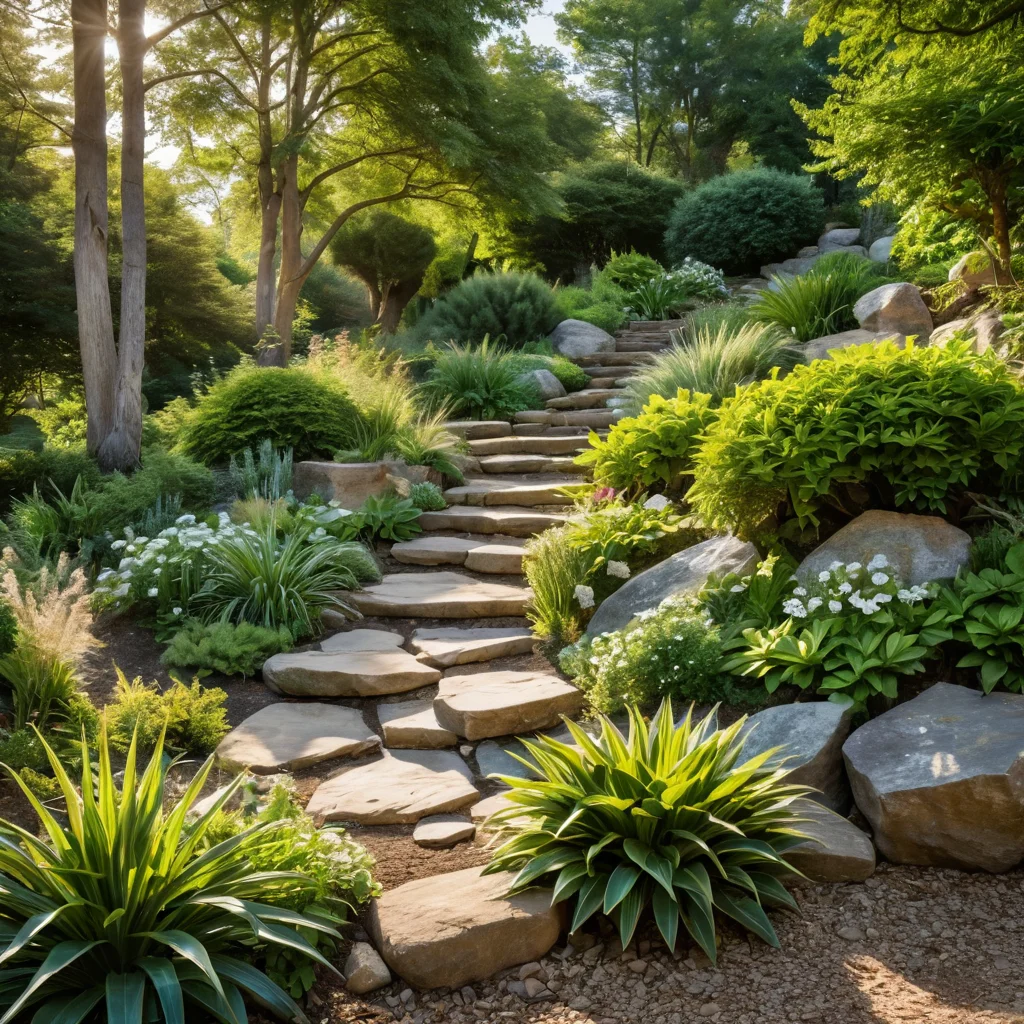
- Description: This is a more pronounced form where a noticeable relief is created. The “snake” can reach 1-1.5 meters in width and extend for several meters in length. The shape becomes more volumetric, with pronounced “waves” and “curves.”
- Features: Often includes larger stones that create natural “ledges” and “grottos.” Plants are planted both on the peaks and in the niches between stones, imitating a mountain slope.
- Application: Can be a striking landscape element, for example, to draw attention to a specific area, create a picturesque view from a window or terrace.
3. Large-Scale “Snake” Landscape Composition
- Description: This is already a full-fledged element of landscape design, occupying a significant area. The “snake” can be multi-level, with height differences, imitating a natural slope or even a small ravine.
- Features: Large boulders are used, creating entire “mountain” systems. Such a “snake” can be integrated with other elements: ponds, streams, wooden bridges.
- Application: Ideal for large plots where a complex, relief landscape needs to be created. It can serve as the basis for an entire garden in a natural style.
4. “Snake” as part of a Rock Garden or Stone Garden
- Description: In this case, the “snake” is not an independent composition but is woven into the overall design of a rock garden or alpine slide, emphasizing their natural texture and creating additional interesting lines.
- Features: The main thing here is harmonious combination with other elements, using stones and plants characteristic of mountain landscapes.
When choosing the type of “snake,” consider the size of your plot, its terrain, as well as your strength and capabilities. Don’t be afraid to start small – even a mini-mixborder can transform your garden.
Choosing a Location for the “Snake”: Light, Terrain, and Plant Neighbors
Choosing the right location is the key to the success of your “snake.” It determines how harmoniously it will fit into the landscape and how well the plants will feel. I always advise approaching this stage with special attention.
1. Lighting
- Sun: Most plants that grow well in rock gardens and mixborders love the sun. Therefore, it’s best to choose a spot that gets plenty of sunlight throughout the day. This is especially important for succulents, alpine flowers, and many aromatic herbs.
- Partial Shade: If your plot is shady or you want to plant shade-tolerant plants, you can find a suitable spot for them too. However, remember that even in partial shade, the lighting can vary. Observe how light falls on the chosen area at different times of the day.
- Orientation: Consider the cardinal direction of your plot. The south side is usually the sunniest, the north – the shadiest. East and west sides offer moderate lighting.
2. Plot Terrain
- Natural Slope: If your plot already has a slight natural slope, that’s a big advantage! You can use it to create a more pronounced relief for the “snake,” saving you effort and materials.
- Flat Surface: On a flat plot, you will have to create the relief yourself by adding soil and forming mounds. This gives more design freedom but requires more effort.
- Proximity to Structures: Avoid areas in close proximity to house foundations or other buildings. Plant roots and moisture can negatively affect them. Also, consider that under trees, there might be too much shade and competition for moisture and nutrients.
3. Plant Neighbors and Visibility
- Visual Perspective: Think about how the “snake” will look from different viewpoints – from the house, from the terrace, from the main path. It should be visible and pleasing to the eye.
- Plant Compatibility: If you plan to plant different types of plants, ensure they have similar requirements for light, moisture, and soil type. This will simplify care and allow all plants to develop well.
- Soil: Assess the soil type in the chosen location. Rock gardens prefer light, well-drained soils. If you have heavy clay soil, it will need improvement.
- Water Supply: Consider water accessibility. Will it be convenient for you to water the “snake,” especially during the hot summer period?
Practical Tip: Before you start digging or bringing in stones, spend a few days observing the chosen area. Note how the sun moves, where shadows form, where water accumulates after rain. This will help you make the optimal decision.
Materials for Creating a “Snake”: Stones, Soil, and Drainage
Choosing the right materials is the foundation of your future “snake.” They determine not only the appearance but also the durability of the composition, as well as the comfort for the plants.
1. Stones – The Main Character
- Types of Stones:
- Natural Stones: These can be granite, sandstone, limestone, slate, basalt. Choose stones of different sizes and shapes, but preferably of the same type, so the composition looks harmonious. Avoid polished or overly smooth stones; they look unnatural.
- Artificial Stones: Modern materials allow for very realistic imitations of natural stones. They are lighter and often cheaper, but can look less natural.
- Quantity: The number of stones depends on the scale of the “snake” and your design. A few dozen kilograms may be enough for a small flowerbed, while tons will be needed for a large-scale composition.
- Preparation: Before use, it’s advisable to clean the stones of dirt and dust. If the stones have sharp edges, they can be slightly smoothed.
- Laying: Stones are laid to look natural, as if they grew from the ground. Larger stones form the base, smaller ones fill in. It’s important that the stones are stable and do not wobble.
2. Soil – The Basis for Life
- Composition: Light, loose, well-drained soil is ideal for a “snake.” A mixture of soddy soil, leaf mold, peat, and sand (or fine gravel) in a ratio of approximately 2:1:1:1 is usually used.
- Adding Nutrients: A little compost or humus can be added to enrich the soil, but don’t overdo it. Excessive organic matter can lead to root rot and weed growth.
- pH Level: Consider the needs of the plants. Neutral or slightly acidic soil is suitable for most alpine flowers.
- Volume: Prepare enough soil to fill the entire area of the “snake,” considering that it will compact.
3. Drainage – The Key to Health
- Necessity: Rock gardens and raised flowerbeds require good drainage to avoid waterlogging, which is detrimental to the roots of many plants, especially succulents and alpine species.
- Drainage Materials:
- Coarse Gravel or Crushed Stone: The bottom layer (10-20 cm) is laid with coarse gravel, broken bricks, or crushed stone.
- Sand: Sand (coarse-grained) can be used in a mixture with the main soil or as a separate layer.
- Geotextile (Optional): Geotextile can be used to prevent the drainage layer from mixing with the soil, but it must be permeable to water.
- Laying: The drainage layer is laid over the entire area of the future “snake” before the main soil is added.
Tip from an Experienced Gardener: Never skimp on drainage! It’s the most common mistake that leads to plant death. It’s better to spend a little more on gravel than to regret lost flowers later.
Step-by-Step Guide: How to Create a “Snake” with Your Own Hands (From Planning to Planting)
Creating a “snake” is an exciting process that will bring you a lot of pleasure. Follow this step-by-step guide, and you’ll succeed!
Step 1: Planning and Marking
- Decide on Shape and Size: Determine what type of “snake” you want to create (mini-mixborder, rock garden, etc.) and where it will be located.
- Draw a Sketch: Sketch an approximate plan on paper. Consider the curves, height differences, and placement of large stones.
- Mark on Site: Use stakes, rope, or a garden hose to outline the contours of the future “snake” directly on the plot. Imagine how it will look in volume.
Step 2: Preparing the Base and Drainage
- Clearing the Area: Remove weeds, stones (if not needed for the composition), and other debris from the plot.
- Creating Relief (if necessary): If the plot is flat, start adding soil, forming the main relief of the future “snake.” Usually, the center is made higher, and the edges lower.
- Laying Drainage: Over the entire area designated for the “snake,” lay a drainage layer (crushed stone, broken bricks, coarse gravel) 10-20 cm thick. Compact it.
Step 3: Laying Stones
- Large Stones as the Base: Start laying the largest stones, forming the main “waves” and “curves” of the “snake.” Press them into the drainage layer or fill to ensure stability.
- Medium and Small Stones: Fill the spaces between the large stones, creating natural height differences and niches for plants. The stones should create the impression that they “grew” from the ground.
- Naturalness: Do not lay stones in a straight line or symmetrically. Nature does not tolerate straightness.
- Filling Gaps: After laying the stones, the gaps between them (if very large) can be filled with soil, but in a way that the stones remain visible.
Step 4: Filling with Soil
- Prepared Soil: Fill the space inside the “snake” with the prepared soil mixture.
- Level: The soil should be slightly above the level of the stones so that after watering and compaction, it settles and becomes level with the lower edge of the stones or slightly protrudes above it.
- Forming: Carefully distribute the soil, maintaining the intended curves and relief.
Step 5: Planting Plants
- Planting Plan: Before planting, arrange the potted plants on the “snake” to see how they will look. Consider their future size, light requirements, and compatibility.
- Planting: Dig holes, add drainage if necessary (e.g., sand or fine gravel at the bottom of the hole), plant the plants, carefully compacting the soil around the roots.
- Watering: Water all planted plants thoroughly.
Step 6: Final Touches
- Mulching: You can mulch the bare soil areas with fine gravel, decorative wood chips, or bark. This will help retain moisture and prevent weed growth.
- Decor: If desired, you can add small decorative elements: figurines, lanterns, but don’t overdo it, so as not to disrupt the naturalness of the composition.
My Secret: I often leave small gaps between stones and in the soil – they are ideal for sowing seeds of unpretentious ground cover plants, which will eventually fill the entire space, making the “snake” even more natural and picturesque.
Plants for the “Snake”: Which Flowers and Herbs are Ideal?
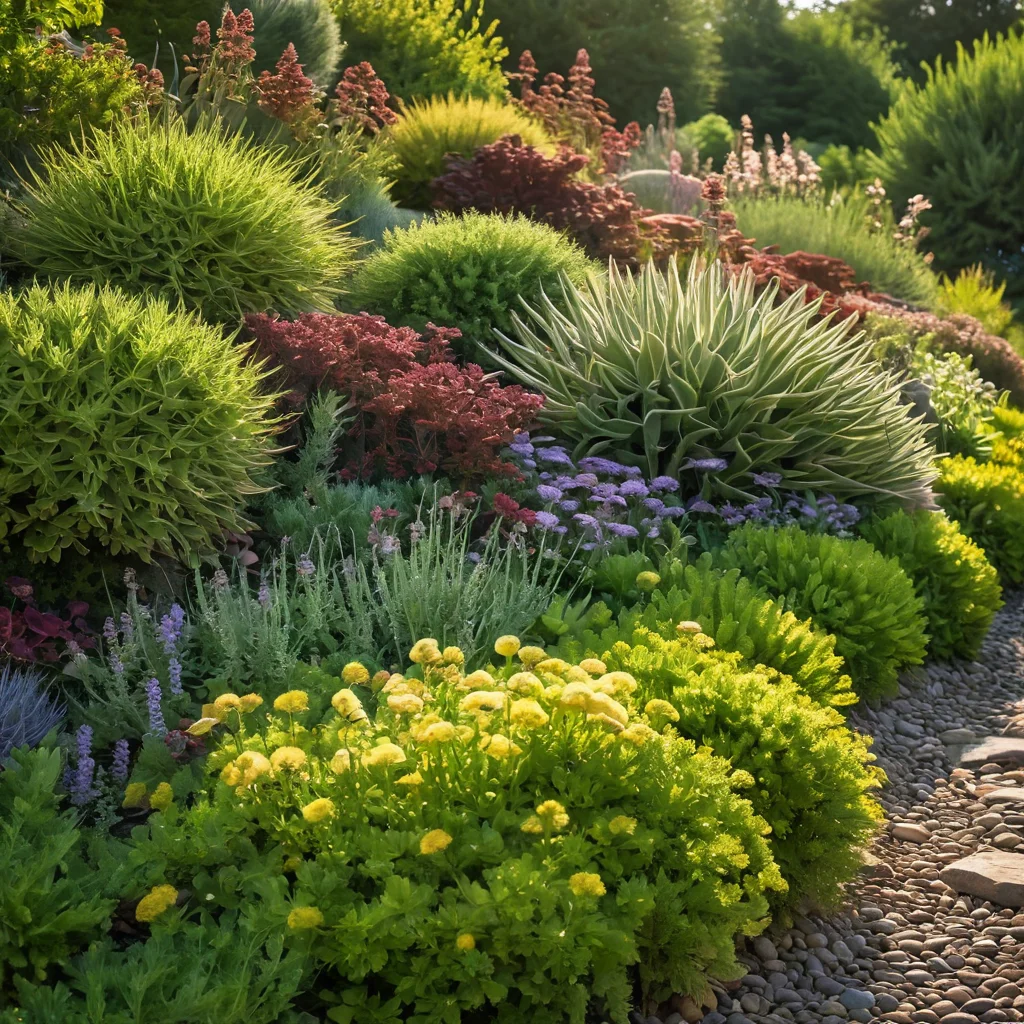
Choosing plants is the most creative part of creating a “snake.” The main rule is to choose those that love sun, good drainage, and are not afraid of a little “stress” from a rocky environment. Here are some excellent, time-tested options:
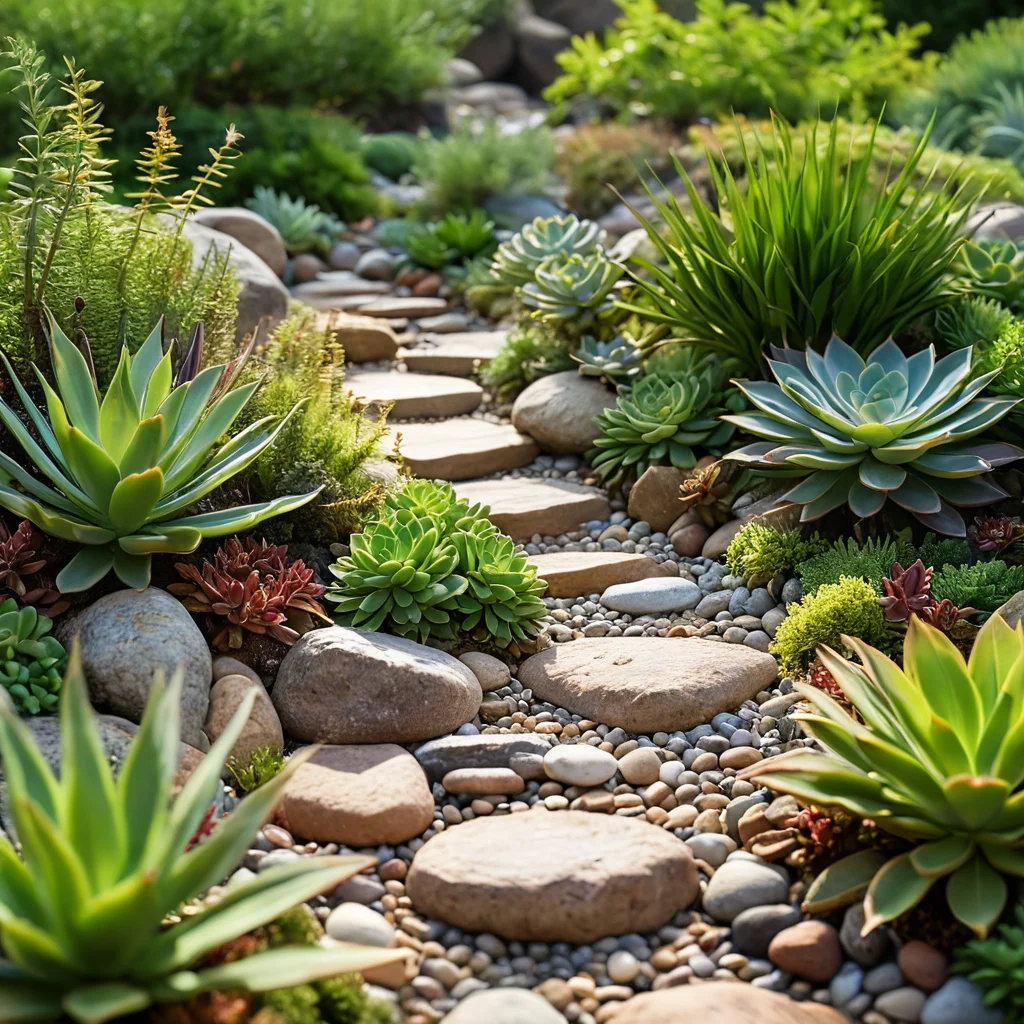
1. Succulents and Sedums
- Why They Fit: They are incredibly hardy, drought-resistant, and come in a variety of shapes and colors. They tolerate hot sun and poor soil well.
- Examples: Sedum acre, Sedum album, Sedum spectabile, Sempervivum (houseleeks) of various species.
- Planting: They grow well in crevices between stones and on sunny slopes.
2. Alpine and Mountain Plants
- Why They Fit: These plants are adapted to harsh conditions, love light, well-drained soil, and do not require abundant watering.
- Examples: Edelweiss (if you can find it), Saxifraga of various species, Dianthus deltoides, creeping thyme, gentians, evening primrose, Phlox subulata.
- Planting: Ideal for creating a “carpet” on slopes and adding accents.
3. Ground Cover Plants
- Why They Fit: They grow quickly, filling the gaps between stones, creating the effect of a natural, “inhabited” landscape.
- Examples: Cypress spurge, Ajuga reptans, Vinca, creeping Jenny (Lysimachia nummularia), creeping sedum.
4. Grasses and Sedges
- Why They Fit: They add lightness, dynamism, and volume to the composition. Their texture contrasts beautifully with stones and flowers.
- Examples: Blue fescue (Festuca glauca), slender bentgrass, various low-growing ornamental grasses.
- Planting: They look good in the background or among stones.
5. Flowering Perennials
- Why They Fit: They add bright colors and extend the decorative appeal of the “snake” throughout the season.
- Examples: Alpine asters, garden geranium (low-growing), lavender, sage, echinacea (low-growing), yarrow.
6. Bulbs
- Why They Fit: Small spring bulbs look great in stone crevices and provide a bright start to the season.
- Examples: Scilla, crocuses, muscari, low varieties of tulips and daffodils.
Selection Tip: Try to combine plants of different heights, leaf shapes, and flowering times. This will make your “snake” interesting year-round. For beginners, I would recommend starting with unpretentious sedums and ground cover plants – they forgive mistakes and quickly create a visible result.
Caring for the “Snake”: Watering, Fertilizing, and Seasonal Work
Caring for a “snake” is not difficult but requires regularity. The main thing is to remember its specifics: it’s not an ordinary flowerbed, but a semblance of a mountain landscape where plants are accustomed to certain conditions.
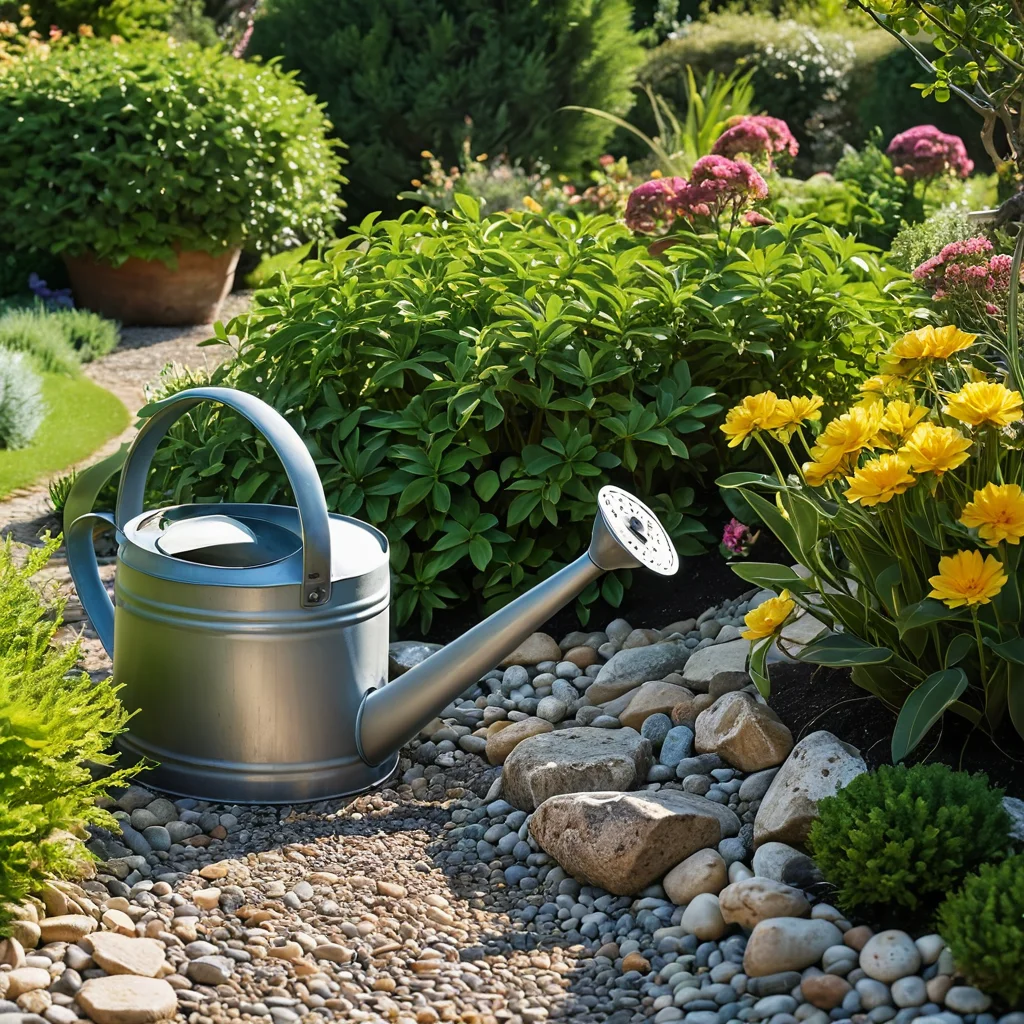
1. Watering
- Moderation: The main rule is not to overwater! Most plants suitable for a “snake” prefer moderate watering. Let the soil dry out well between waterings.
- Frequency: In hot, dry summers, watering may be needed 1-2 times a week. In cool and rainy weather – less often or not at all.
- Watering Method: Water at the base, trying not to get water on leaves and flowers, especially in sunny weather, to avoid burns. Use a watering can with a diffuser or a hose with a gentle spray.
- Watering Time: The best time is early morning or evening, when the sun is no longer so active.
2. Fertilizing
- Moderation: Rock gardens and “snakes” do not like excess fertilizers. Excessive feeding can lead to lush green growth at the expense of flowering, as well as the development of diseases.
- When to Fertilize: Usually, one or two feedings per season are sufficient. In spring, during active growth, you can apply a complex mineral fertilizer for flowering plants at half strength. In autumn, you can fertilize with phosphorus-potassium fertilizers for better overwintering.
- Types of Fertilizers: Use special fertilizers for rock gardens or universal fertilizers in reduced concentrations.
3. Weeding
- Regularity: Weeds are the main enemy of the “snake.” Remove them as they appear, especially young shoots, before they have a chance to root and take nutrients from cultivated plants.
- Carefulness: Weed very carefully to avoid damaging the roots of delicate plants and disturbing the composition’s structure. It’s best to use small garden tools or do it by hand.
4. Seasonal Work
- Spring:
- Cleaning from winter debris (dry leaves, branches).
- Inspecting plants, removing damaged and dried parts.
- Fertilizing (if necessary).
- Checking the stability of stones, adjusting them.
- Summer:
- Regular watering (as needed).
- Weeding.
- Removing faded inflorescences to stimulate re-blooming (in some plants).
- Autumn:
- Removing faded plants (if they are annuals or severely damaged).
- Preparing for winter: some plants (e.g., sensitive sedum varieties) can be covered with spruce branches or dry leaves.
- Fertilizing (phosphorus-potassium fertilizers).
- Winter:
- The “snake” remains beautiful in winter, especially if plants with decorative foliage or structure are used.
- Ensure that stagnant meltwater zones do not form under the snow.
Tip: In the first few years after creating the “snake,” it will require more attentive care. As the plants grow and establish, and the stones settle into their “natural” positions, care will become easier.
Common Mistakes When Creating a “Snake” and How to Avoid Them
Even with the best intentions, mistakes can be made that will later dim the joy of your garden creation. I have compiled the most common blunders so you can avoid them.
1. Incorrect Location Choice
- Mistake: Choosing a too shady spot for sun-loving plants, or conversely, a very hot and dry one for moisture-loving plants.
- How to Avoid: Carefully observe the chosen area throughout the day and season before starting work. Consider lighting, moisture, and wind direction.
2. Poor Drainage
- Mistake: Ignoring or insufficient drainage layer, leading to waterlogging and root rot.
- How to Avoid: Be sure to lay a drainage layer of crushed stone, gravel, or broken bricks at least 10-15 cm thick. Use light, loose soil for planting.
3. Using Unsuitable Stones
- Mistake: Using stones that are too small and easily washed away, or conversely, too large and difficult to lay naturally. Also, using unnatural, overly smooth, or colored stones.
- How to Avoid: Choose stones of different sizes, but preferably of the same type. Large ones for the base, medium and small ones for filling. Lay them so they look natural, as if they have grown into the ground.
4. Too Many Plants or Incorrect Placement
- Mistake: Planting plants too densely, without considering their future growth, or placing them without regard to light requirements (e.g., shade-lovers in the sunniest spot).
- How to Avoid: Before planting, arrange the potted plants to see how they will look. Leave enough space for growth. Consider plant heights (tall ones in the back or center, short ones at the edges).
5. Excessive Use of Decor
- Mistake: Overloading the “snake” with various figurines and artificial elements, which disrupts the natural appearance of the composition.
- How to Avoid: Remember that the main decorations of the “snake” are the stones themselves, the relief, and the plants. Decorative elements should be minimal and harmoniously integrated into the overall style.
6. Incorrect Care
- Mistake: Overwatering, excess fertilizer, ignoring weeding.
- How to Avoid: Study the needs of each plant. Water moderately, fertilize only when necessary and in minimal doses, and remove weeds promptly.
7. Forgetting About Perspective
- Mistake: Creating a “snake” without considering how it will look from different points of the plot.
- How to Avoid: Plan and create the composition so that it is beautiful and harmonious from any viewing angle – from the window, from the terrace, from the main path.
Creating a “snake” is not only an opportunity to decorate the garden but also a wonderful way to better understand nature, to learn to see beauty in the simple and harmonious. Follow our advice, put your soul into it, and your garden will surely respond to you with beauty and coziness. Good luck with your gardening experiments!